
How to Make Lighted Christmas Balls
This post may contain affiliate links, please see our policy for details.
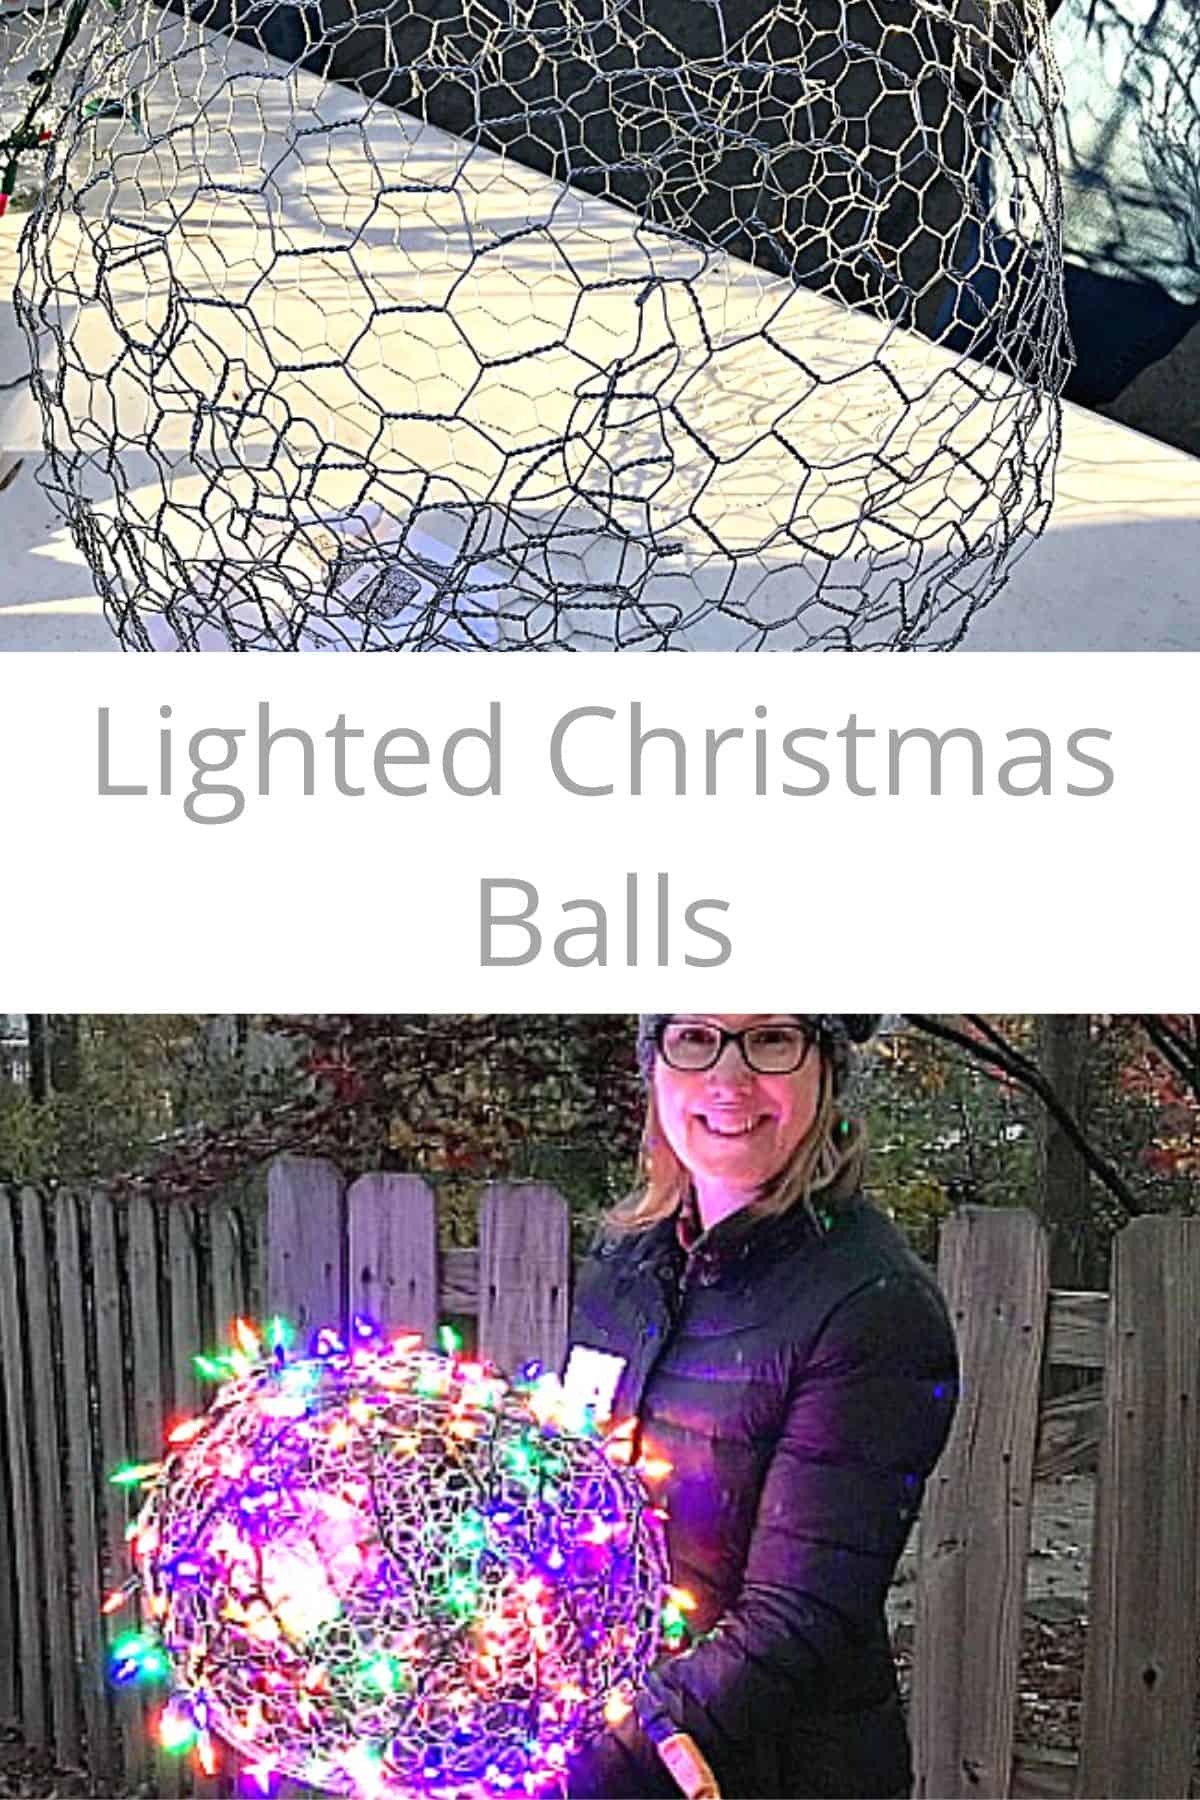
How to make lighted Christmas balls, and how to hang them outside in your trees.
I’m so excited to share this holiday tradition that we participate in with the rest of our neighbors every year.
Make sure you check out the short video on how we hung them at the end of the post.
")
We love to do some some outdoor DIY Christmas decor but we’ve never seen, or heard of, lighted Christmas balls until we moved to North Carolina.
We were first introduced to them when we looked at our house, 2½ years ago.
As we looked around the house, in the basement, Roger asked the real estate agent what the chicken wire balls were, and why the owners left them.
She then preceded to explain the whole lighted balls tradition to us.
About 15 years ago a family in our neighborhood made and hung a handful of chicken wire lighted balls in the oak trees at their house.
Word spread throughout the neighborhood and, within a few years, most of the neighborhood was participating.
These days it’s taken on a life of its own.
Our neighborhood turns into a lighted ball winter wonderland right after Thanksgiving every year.
We even have a fun, nighttime 5k through our neighborhood, right before Christmas, to help raise money for local food banks.
It’s turned into a beautiful tradition that has given us the ability to buy thousands of meals for families who need them most.
So…let’s talk about making these lighted beauties.
Supplies to make lighted Christmas balls
- 2’x4′ piece of chicken wire for each ball – make sure it’s 1″ mesh
- 2, 100 ct. strands of lights for each ball (we like to use LED)
- work gloves
- wire cutters (if you need to cut the chicken wire)
Our neighborhood has a workshop/covered dish every year, right around Thanksgiving, where we get together and make balls.
It’s a fun start to the beginning of the holiday season.
We get to make a few balls for our growing collection and catch up with neighbors we haven’t seen since the last get together.
Let’s make DIY lighted balls!
They’re really pretty easy to make. Obviously it takes some patience to work with the chicken wire but it’s not hard.
This has been our third year making them so we’ve figured out that if the hubs starts the ball, connects the ends and starts shaping it, I can finish it up by forming the perfect ball shape.
This part is where you need patience, and I have a little more than hubs so it’s the perfect job for me.
I also wrap it with 2 strings of LED colored lights.
Let’s take it step by step…
To make one ball, we used a 2’x4′ piece of chicken wire and 200 lights. That’s it!
 pic")
First, you need to take the length (of one 2’x4′ piece of chicken wire) that was cut and roll it into a cylinder.
Take the tabs from the cut ends and fold them into each other to bind the ends together.
Just a quick word of caution…it’s recommended to use work gloves when you’re working with the chicken wire.
We both started out with them but found it too hard to work with them on.
 pix")
After the tabs are all bent over you should have a chicken wire cylinder. Now you want to work on the ends.
Do one end at a time and just start bending and shaping it to close it in.
You need to push the top of the cylinder about half way in to the center and then you’re going to fold the wire into itself.
 picture")
Just work your way around until you close up the end. There may be a hole in the end but that’s ok.
 image")
And remember…we’re not going for perfection, just something that resembles a round ball.
 photograph")
Once the ends are closed up, you can push and pinch the chicken wire to form a ball.
It takes a bit of work to get it in the perfect round shape but it’s worth it when they are hanging in the tree all lit up.
 snap")
After the ball is formed, it’s time to wrap it with Christmas lights.
I just start in the middle and wrap the lights around, trying to spread out the lights.
 shot")
We like to use LED lights, with a green or black wire so that it kind of blends in with the chicken wire.
The LED lights last much longer than traditional Christmas lights and that’s a good thing when lights are hanging high up in the trees.
Don’t want to make them yourself?
You can purchase lighted balls already made.
 finished image")
Hanging the Lighted Balls
It seems that every household has a different process for hanging the lighted balls.
We’ve heard of neighbors using a baseball to throw a string over tree limbs but we decided to try a water ballon sling shot (with a few alterations).
You can also buy an arborist sling shot if you don’t want to make something.
So, hanging the balls is a bit of a process. I made a quick video when we hung them up this year, that you view at the end of the post.
Supplies we used to hang the lighted balls
- sling shot
- weight (we use a lacrosse ball)
- eye bolt
- string strong enough to pull the ball up into the tree and hold it there
- extension cords
To start, we screwed the eye bolt into the weight (in our case, a lacrosse ball).
 weight, hook and string")
Then, we cut a long piece of the string (you want it long enough to to go over a high tree limb and down the other side).
We took the one end of the string and tied it to the eye bolt and placed the lacrosse ball in the sling shot.
 weight and string")
Next, you pick a thick limb to shoot your anchor (lacrosse ball) over to hang a ball.
Sometimes it takes a few times, and a few stuck balls, but we usually get it.
Once the weight goes over the limb and falls down the other side, we untie the string from the weight and retie it onto the chicken wire ball.
 outdoor pic")
Next, we plug in the long extension cord to the lights on the ball.
Then we take the other side of the string and pull it so the ball raises up into the tree.
We wrap the string around the tree to secure the ball in place on the limb. Plug in your extension cord and you are in lighted ball business.
There are cords all over and it doesn’t look great during the day, but you can’t tell at night.
We are newbies so we only have about 16 lighted balls. Some neighbors have 30, even 40 balls.
That’s a lot, and a ton of work, but when you see them all lit up at night it’s truly magical.
