
Easy Board and Batten Wall
This post may contain affiliate links, please see our policy for details.
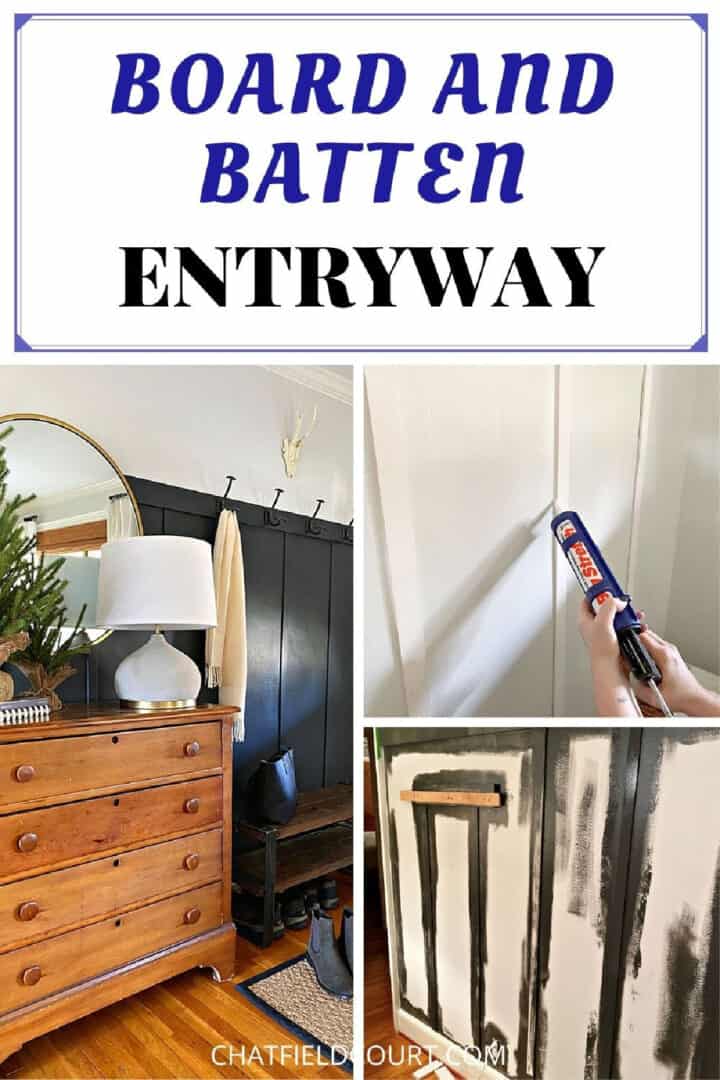
How to create an easy board and batten wall in a small entryway to create drama.
I’ve painted almost every room in our cottage but I’ve been wanting to add some interest to each space.
Several months ago I painted an accent wall in our sunroom and now it’s time for our small entryway to get a little facelift with an easy wall treatment.

My new board and batten wall, or as some call it wainscotting, was seriously so easy to do and the whole transformation just took a weekend to create.
What is board and batten?
Board and batten can be used both as an exterior siding or as interior wall paneling. The name comes from the boards and the wooden strips, commonly called battens.
Generally battens are placed vertically but they can also be installed horizontally or on angles.
Our board and batten wall treatment is a cheater, or easy version. I used 1-1/2″ lattice for the battens and no boards on the wall.
Same effect without the work and expense.
Supplies for board and batten
- primed lattice
- 1″x4″ primed pine
- caulk
- paint (I used Behr Satin Black)
Tools
How to do board and batten
Ok, I guess since we aren’t using boards that this technically is just batten but the result is the same.
So, the first step in this process was to figure out how I was going to place the batten.
I had no idea what I was going to use for wood so I went into our scrap stash and pulled some pieces out.
To get a feel for the look I was going for, I taped the scrap wood to the wall.

Weird, maybe…but it helped me narrow down my choices.
What material is used for easy board and batten?
Wood is the norm for board and batten, specifically 1×4 or 1×6 pine. We live in a 1946 house with 80 year old trim baseboards and plaster walls so I had to figure out a different size board to use.
I didn’t want to replace the baseboard, with said plaster walls, because I knew ripping off the trim would make a huge mess.
So, in order for the battens lay flush against the baseboard trim I needed to find something slim, not a 1×4 that is traditionally used.
I settled on a piece of primed lattice.
It was a bit narrower than I had wanted but it sat perfectly flush against the baseboards, or floor trim.
With the battens figured out, I moved on to the top railing.
I knew that I wanted to add a railing so that I could hang our coat hooks on them. We had a 1×4 piece of pine in the basement and it seemed like the perfect size to go with the lattice battens.
Spacing and height of the battens
Now that I knew which materials I would use, I started measuring to figure out the board and batten height and spacing.

I took the width of the wall and a rough estimate of how far apart I wanted the battens. I went with 14″ in between strips which resulted in 6 evenly spaced battens.
The height of the battens, where the top rail board would be installed, would be where we hung the coat hooks when we moved in.
I didn’t want to fix holes and make new ones in the wall so this seemed like a no-brainer.
Once the measurements were made and the materials were decided on, I went shopping. I picked up 6, 6′ pieces of primed lattice and a 9′ piece of primed 1×4 pine.
The wood was trimmed in the store so it was close to the measurements I needed. I didn’t want to waste money on wood that would just go in the scrap bin.
It still needed a little trim on the miter saw once we got home, but I had very little scrap.
Total for wood: $35

After I trimmed the rail board, I was ready to install it.

I managed to find 4 studs in our 80 year old cottage wall, so I was able to easily level and secure the 1×4 pine board with screws.
The battens were next.
Installing the battens
Like I said, we live in an 80 year old cottage and nothing is level or square so I had to measure and cut each batten separately.
I just measured from the top of the baseboard to the bottom of the rail I installed.

After I trimmed each batten, I used the level to make sure the batten was straight and secured it in place with the brad nailer.
I measured each batten before I secured it to be sure my spacing was accurate.
Once I installed all the battens, I caulked all the nail holes and seams.
It’s not the most fun job to do but it makes a huge difference, and hides all of the gaps and spaces.

After the caulk dried I sanded a few rough spots and got ready to paint.
Painting the board and batten
I had every intention of painting the new accent wall white but changed my mind at the last minute and went with a dark color.
The front door got a makeover during this process as well and I went with this dark gray/black color so I decided to try it on my new wall treatment.

It was a little scary going on but I knew that I could repaint if it didn’t work out. Roger hated it…and it didn’t bother him to tell me so.
A board and batten entryway
Luckily, it all worked out in the end.
All I had to do was to hang the coat hooks and the mirror and this project was done.


I love how it turned out and I love the dark color, especially with my antique pine cabinet.
The battens add so much texture and interest in our tiny cottage entryway.

