
Easy DIY Nightstand from a Thrift Store Stool
This post may contain affiliate links, please see our policy for details.
How to make an easy DIY nightstand from a grungy, old thrift store stool.
I’ve slowly been working on a guest bedroom makeover and one of the last things I needed to do was to make a cheap DIY nightstand that I could put next to the bed.

Like the rest of our house this bedroom is tiny, and has an awkward layout, so I couldn’t just stick a regular sized nightstand in there. We only have a sliver of space to use so I needed to get creative.
Don’t forget to check out my printable How-To card at the end of the post.
What can I use instead of a nightstand?
I knew that with a little imagination I could create the piece that I needed.
My first thought was to use an old crate. It’s an easy solution but knew that I could do better.
When I found a cool old metal stool at a thrift store, that’s adjustable, I knew it would make the perfect nightstand for our newly remodeled guest bedroom.
Supplies to make a DIY nightstand from a stool:
- old stool
- pliers
- scrap piece of wood
- old paint colors (I used 5)
- wood stain
- paint brush
- tack cloth
- rubber gloves
- wood wax
Tools:
I loved the patina of the metal legs but the dirty fabric and funky fringe had to go.
Making an easy DIY Nightstand
My plan for this old shop stool was to give the legs a good cleaning and remove the fabric and fringe in the hopes that the wood underneath was usable.

I removed the screws for the seat and started to pull out the old, rusty staples that held the fabric on.
Once I got far enough to see the wood seat it was obvious that I couldn’t reuse it.
It turned out to be a thin piece of particle board.
Instead of working to get the fabric off, I just abandoned the seat.

Because I couldn’t use the seat like I had hoped, I had to formulate a new plan.
I scrounged around the basement looking for a suitable top and found a piece of oak in the scrap wood. It wasn’t round like I had planned, but I thought I could make it work.
I made a few measurements and trimmed it up on my chop saw.
Once I had the wood to the size I needed, I went to work on the finish.
The idea was to use some paint to make it look old and then I would stain it.
So, to get started I pulled some of my favorite old paints from the paint cabinet to begin.
I knew I wanted to use colors from the room, so I found the navy blue that I used on the dresser and the gray from the walls.
White and turquoise paint, as well as black and yellow, were also added to the mix.

To begin, I took a small amount of one of my paints, the navy blue, and lightly dry brushed it randomly on the wood.
I did that with each color, only adding a small amount and putting it in random spots.
I stepped back several times to check my work and added where I thought I needed more.

When I was satisfied with the look, I let the paint dry.
Once the paint was dry, I took the wood outside so I could sand it down using my palm sander.

You can sand as little or as much as you want. I was only looking for a hint of color so I ended up sanding a lot of the color away.
I used a tack cloth to remove all of the dust.
The next step was to apply stain. I wanted a dark wood tone so I applied a dark walnut stain on the top and four sides.
I just rubbed it on with a soft cloth and quickly wiped it off.

After the stain had dried I realized that it wasn’t quite the color I was going for. I wanted the wood to have a darker tone, less golden brown.

To fix the golden hue, I took some very watered down black paint and quickly wiped it on the wood over the stain.
The black paint was the perfect solution.

To finish off the antique look of the wood I applied two coats of a dark colored wax with a soft cloth.
Not only does it look great (and adds depth to the piece) but it also adds an extra layer of protection.

With the wood top complete, I attached it to the freshly scrubbed stool.
First, I drilled pilot holes for my screws and then used the old screws and washers to secure the wood top.

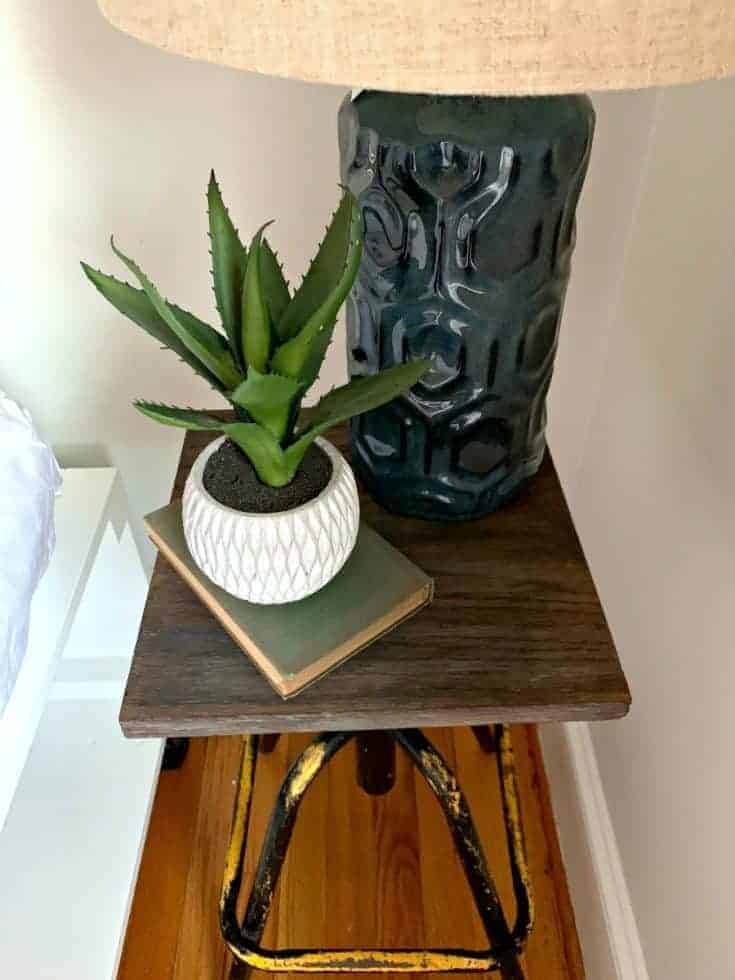
It’s the perfect size for the small corner in the guest bedroom with enough space for a lamp and a small plant.
I also love that the top is adjustable, so I can put it at the right height for our DIY platform bed, and it’s very sturdy.
CHECK OUT MORE OF OUR DIY FURNITURE PROJECTS and DIY Nightstand Makeovers!
DIY Rustic Nightstand Makeover
DIY Industrial Nightstand

Easy DIY Nightstand from a Thrift Store Stool
An easy DIY nightstand made from an old, thrifted stool with a scrap piece of wood. It's the perfect addition for a small guest bedroom corner.
Materials
- old stool
- piece of wood - oak or pine
- paint
- tack cloth
- stain
- paint brush/sponge
- wood wax - optional
Tools
- screwdriver
- chop saw
- drill
- palm sander
Instructions
- Remove screws under seat with screwdriver
- Remove seat and discard
- Clean stool
- Find piece of scrap wood (cut to desired size)
- Sand piece of wood
- Use tack cloth to clean dust off of wood
- Gather several old paint samples
- With a paint brush, dry brush different colors on piece of wood (using light strokes)
- Once you are satisfied, let paint dry
- After paint is dry, use palm sander to remove some of the paint (this is a personal preference)
- Use tack cloth to clean all dust from wood
- Use a cloth or brush and wood stain to stain wood
- Wax stained wood with a soft cloth, buff and let dry
- Secure wood top with screws from old seat
Notes
I ended up using a bit of watered down black paint after the stain to tone down the golden hue of the wood.
Amazing transformation! Looks totally perfect
Thanks so much, Maria!
What a great transformation! I absolutely love your paint and stain technique and creative solution for your space.
Thanks so much, Karen, I appreciate it! It really was an easy project and it was fun playing with all of the different paint colors. 🙂
Love your little side table and it looks really handy too!
Thanks so much, Claire! It’s really worked out quite well in this tight space.
Beautiful! I absolutely love how this turned out. Love how you used the combination of paint, stain and wax. Looks so pretty in your guest room!
Kristi, what a cool find! I love the paint, stain, and dark wax combination that you used on the oak top! This is such a pretty and one of kind side table, and it really fits the space and looks perfect there!
Thanks so much Kaycee, I appreciate it! I really wanted to repurpose this stool and I’m so glad that I could use it in this space. 🙂
kristi, i wish I could see beyond an old beat up stool more often. what a creative way to use it in your guest room.
Thanks so much, Laura! I love the old patina of the stool and I’m happy that it fit in this tight space.
Wow, Kristi! You really did an amazing job! From the industrial stool, to utilizing your space, to a whole new piece, it looks incredible. Very impressive, my friend. Thanks for sharing your creativity.
So sweet! Thanks so much, Meegan! This was a tough space to fill because it’s so small so I’m thrilled that I was able to find something to fit. 🙂
Wow! What a cool transformation! You are so clever! I’m going to be on the hunt for some neat old stools now! It’s great linking up with you and the other Thrifty Style ladies! Thanks for sharing such a great tutorial!
Thanks so much, Kristi! I kind of have a thing for searching for old stools and chairs. I had to dig this one out of an attic but it was worth it. It’s definitely one of my favorite finds.
I really love this idea and now it’s on my list for the next time I hit a flea market, thrift store or antique mall. I can see all kinds of uses for it. Night stand, plant stand or just all-occasion stand.
Thanks so much, Patti, I appreciate it! Yes, it can be used in many different ways. I like that it’s so sturdy and that I can adjust the height.
Great idea, looks so nice and fits perfectly.
Thanks so much, Marlene! It turned out better than I’d hoped, and fits perfectly in this tight, little corner.
I have a recently project that took much longer than it should have too! In the end, I’m glad you persevered because this turned out so cute! Perfect vintage style and it fits so well in that little corner!
Thanks so much, my friend! I knew that the bedroom would take time but I never imagined 2 years, and we’re still not done. 😉 I’m just happy that I found something to fit in this tight corner.
I love this so much! I would never see that pouffy, fringey stool and think to turn it into a cool industrial-looking table like that! It turned out amazingly well and I love it in the little spot!
Thanks so much, Courtenay! It was one of those rare, lucky finds. As soon as I saw it I knew that it would be perfect for this spot in our guest bedroom.
Cute, smart and thrifty solution and it is now pinned to my creative furniture board.
Thanks so much, Bliss! I appreciate it!