
Easy Tulip Wreath DIY
This post may contain affiliate links, please see our policy for details.
Nothing says spring like a fun wreath greeting you and your guests on the front door. Embrace the season of blooms with our DIY tulip wreath project!
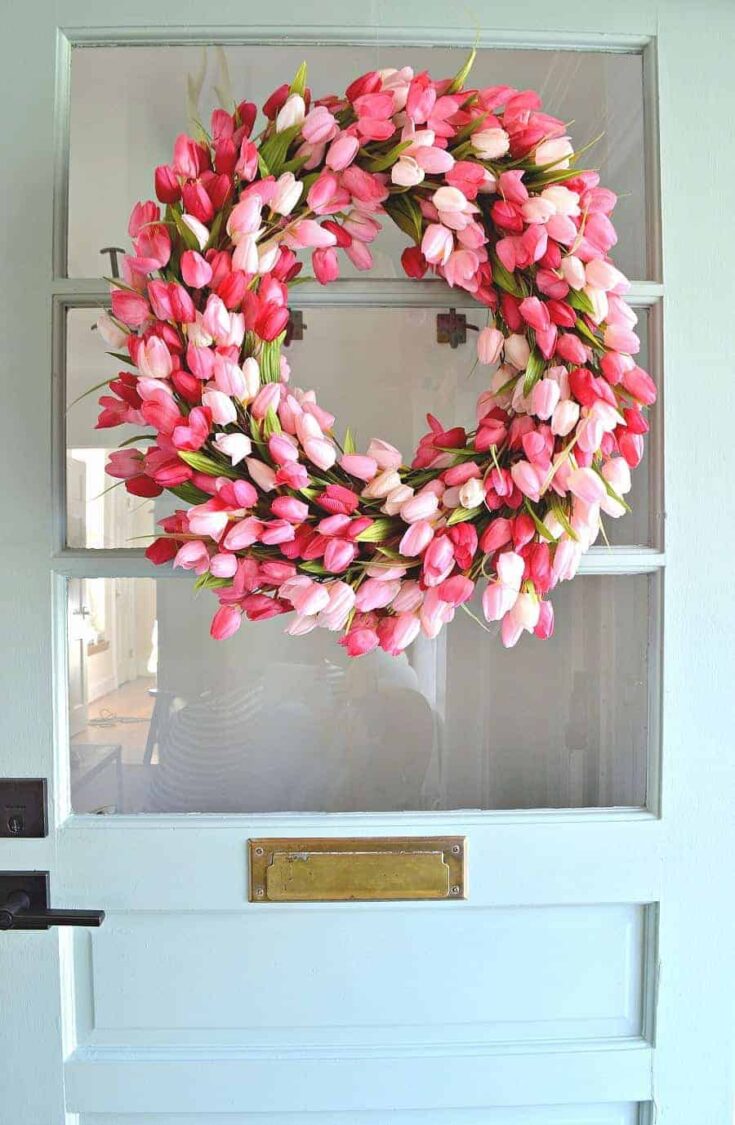
Spring has definitely sprung here at the cottage (inside anyway) and it all starts at the front door with this pretty DIY tulip wreath.
I usually hang a basket on the front door and add some flowers to it. This spring I wanted something different so I went with a big pink tulip wreath.
Pink?
Yes…lots of pink. It’s not my usual color palette, that’s for sure, but there’s no denying that it screams spring.

I’m loving it on my new farmhouse style front door. It’s the perfect spring welcoming touch.
Check out the full tutorial in the How-To card at the end of the post and our Web Story.
Tulip Wreath Supplies
Cost is a factor in every project I do and this one was no different.
I knew that I would need a fair amount of tulips to make the wreath look full so I waited for a sale before I pulled the trigger.
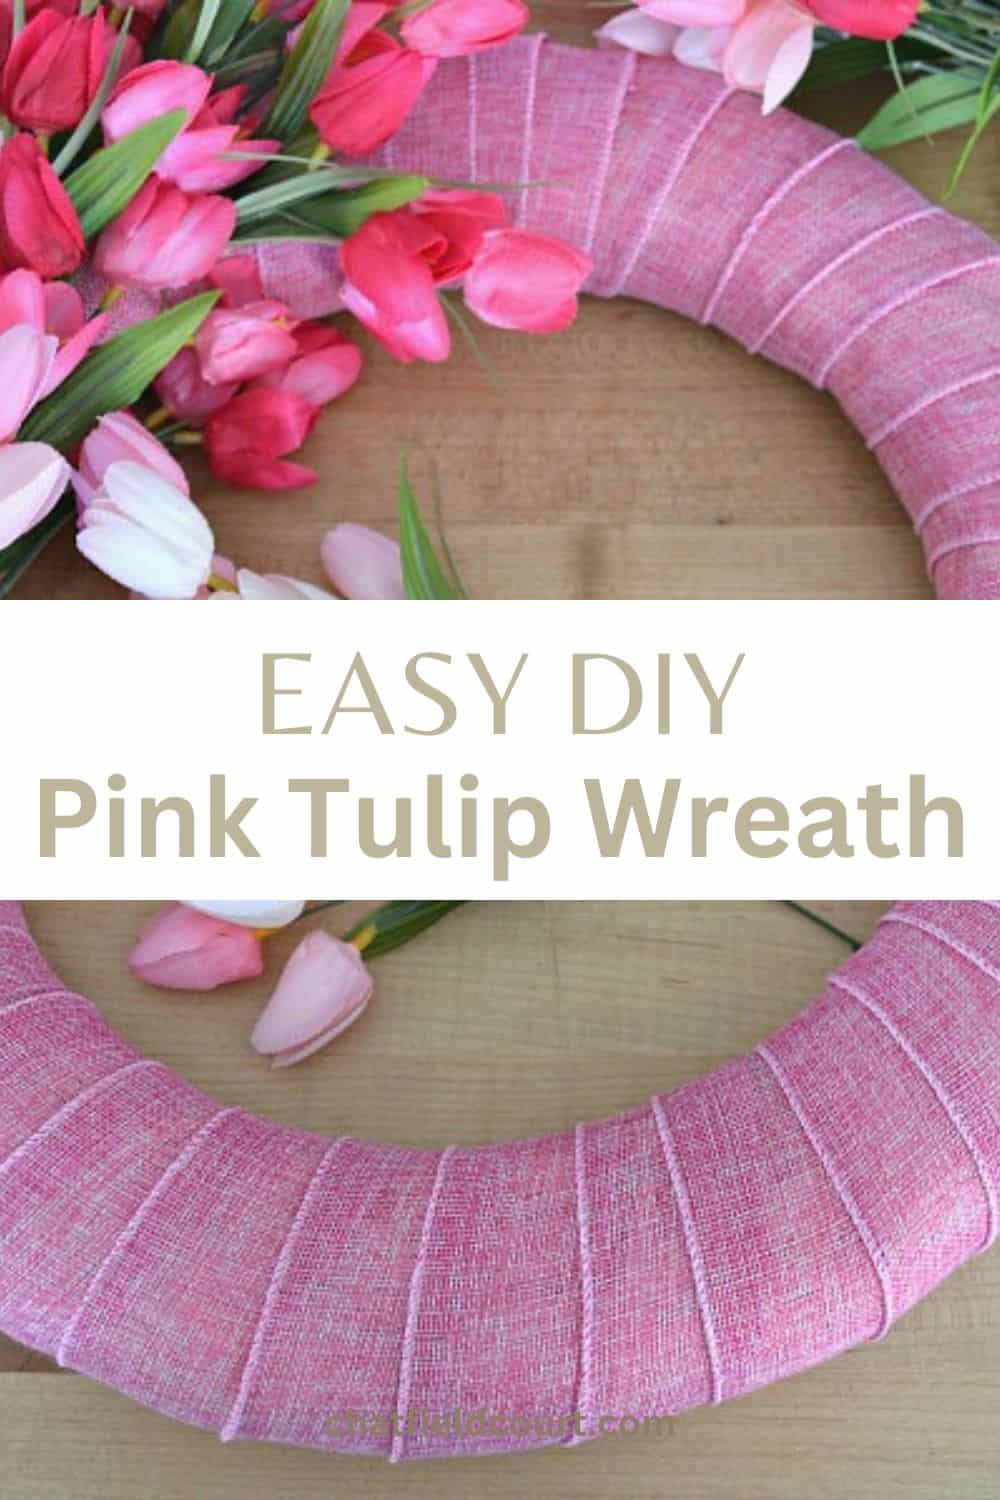
It ended up taking 13 bunches and I was able to snag them for $2 a bunch. The burlap ribbon, that I found at the Dollar Store, was another steal at just $1 a piece.
For the wreath form I chose wrapped straw, thinking it would be the easiest to work with, and easiest to stick my flowers in.

How do you make a tulip wreath?
I knew what I wanted my finished wreath to look like but I had no clue if it was going to work.
The idea was to wrap the wreath form with the ribbon so I could stick the stems in the seams and have them stay in place.
No glue necessary!
It worked!
Through a bit of trial and error, I learned that the ribbon should be wrapped on the loose side.
Not loose enough that it would move around, but loose enough so that you can stick the stems in the seams.

Next, I cut off each stem from the main one using my wire cutters.
I tried to keep each stem fairly long in the hopes that they would have a better chance of staying in place.

As far as placing the faux flowers, my plan was to use the dark pink and add the light pink in a few spots here and there. I ran out of dark pink flowers pretty quickly so I resorted to Plan B.
Plan B?
Yeah, not a real plan.
I just ended up eyeballing it and spread the light and dark around until it looked good.

Adding the stems was so simple.
I just worked my way around, pushing each stem into the seams of the ribbon. Some of the stems ended up going through the plastic wrapping of the wreath form, which was added security.
I didn’t worry about each one going all the way through, though. As long as each flower stem was all the way in the seam, they were good to go.

That’s it…easy peasy.
A little fluffing and she was ready to hang on our new front door.
I asked the hubs what he though about my spring tulip wreath.
His answer? “Well, it’s pink!”
Ummm…thanks Captain Obvious. 😉
What kind of DIY spring decor do you like to make?

Easy Tulip Wreath DIY
Add a touch of spring color to your front door with this easy pink tulip wreath DIY tutorial.
Materials
- 14" wreath form
- ribbon
- faux tulips
- straight pins
- fishing line or ribbon
Tools
Instructions
- Gather supplies
- Cut off each stem from the main flower stem using wire cutters. I tried to keep each stem fairly long in the hopes that they would have a better chance of staying in place.
- Lightly wrap ribbon around wreath form (not loose enough that it would move around, but loose enough to allow you to stick the stems in the seams)
- Secure ends with straight pins
- Working my way around the wreath form, I pushed each stem into the seams. Some of the stems ended up going through the plastic wrapping of the wreath form, which was added security. I didn't worry about each one going all the way through. As long as they were all the way in the seam, they were good.
- Fluff tulips
- Use fishing line or ribbon to hang wreath
.
Notes
- As far as placing the flowers, my plan was to use the dark pink and add the light pink in a few spots here and there. I ran out of dark flowers pretty quickly so I just ended up eyeballing it, spreading the light and dark around until it looked good.
Recommended Products
As an Amazon Associate and member of other affiliate programs, I earn from qualifying purchases.


Thank you so much for sharing your tutorial on the pink tulip wreath. I have Been a crafter all my life and I do best with photos but the tips like leaving the ribbon fairly loose was very helpful, I made mine in shades of yellow and I love it! Thanks again! Marcia
Thanks so much, Marcia! I’m glad you found my tutorial helpful. Love the thought of a yellow wreath. I’m sure it’s beautiful!
Ohhh, it’s so pretty! I love the pink, it is a perfect contrast to your gorgeous front door. Happy Spring!!! ???
Thanks so much Julie, I appreciate it! Happy Spring!
Such a beautiful wreath I can’t wait to make it for my front door. What color did you use for your door? I love it! I may use it to paint an old church pew.
Thanks so much Trish! Would love to see it hanging on your door when you’re done. The paint color on the front door is Wythe Blue from Benjamin Moore. Love the soft color!
Hi! This will be the first wreath that I make 🙂 About how many bouquets of tulips did you get? Thank you!
I am Barbara How do you get the ribbon to stay on do you tie in a knot on the back of Wreath, I am making the tulip one I love it
Hi Barbara! So glad to hear that you are making the tulip wreath. I just wrapped the wreath form with the ribbon, not too tight, and when I came to the end, I just stuck a straight pin or two into the wreath form to secure it. I haven’t had any issues with it coming undone. Best of luck on your project! 🙂
Thank you for getting back to that was so nice ,I did the wreath for my front door and my sister loves it .
I will put the pins in it thank you Barbara
How did you secure it to the door? Thanks. And, it’s beautiful!
Thanks Teresa! I just used a length of fishing line around the wreath form, tucked in the tulips, and hung it on the top of the door with a few thumbtacks. Hope that helps.
I adore it! It’s beautiful! I’m going to make a green and white one for St. Patty’s Day! Thank you!
Thanks so very much! That sounds like a great idea, Mandy! Would love to see it when you’re done.
Between the pink tulip and magnolia wreaths I cannot pick a favorite. Both are equally beautiful and both present a warm welcome to your home.
Two DIY projects that are truly works of art. What will you come up with next?❣️❣️
Thanks! I love them both, too. Still trying to figure out what to make for this Spring. 🙂
Beautiful wreath! Have you had any issues with the flowers getting loose or falling out since it is not glued in or pinned? Thank you
Thanks Nicole! No, I haven’t had any issues with flowers falling out. I’m just getting ready to get it back out for spring but none of the flowers have fallen off while it was in storage.
Beautiful wreath! What size wreath form did you use?
Thanks so much, Wendy! I used an 18″ straw wreath form for my tulip wreath. Hope that helps. 🙂
Gorgeous wreath! I love everything about this pin. The door style is perfect and color combo of the pink tulips with the blue is amazing!! You If you don’t mind me asking, can you tell me the name of the door color? I’ve been looking for a light blue and that one is perfect!!! Thanks for the inspiration!
Thanks so much Tracy. I appreciate your sweet comment. If you click on the link in my wreath post, it will take you to all the info on the door, including the door color. Hope that helps.
I love this color! I used a darker version on our door in another house and loved that but wanted to try something different.
Not only is your wreath beautiful, but I love your process of first wrapping the wreath with pink ribbon. I think I need to give this a try on my front doors, which look a lot like your new door…so naturally I love it! Thanks for sharing the idea with us. Cherry Kay
Thanks so much! I didn’t want to mess with hot glue so I thought I’d try the ribbon first. I was so happy that it worked. I hope you give it a try for your front doors. Mine definitely turns heads.
If that wreath goes missing off your front door, I had nothing to do with it! Beautiful!
Bwahaha! Too funny! Thanks for telling me because you never know in our neighborhood lately. 😉
Nice job! I love the way you blended the different colored tulips naturally. I’d love to make one but wondered if you could share approximate number of tulips you used?
Thanks so much Jenny! I love the way it turned out. I’m so glad you want to make your own. I’m pretty sure I included the number of bunches that I used in my instructions. I’m not sure how many flowers were in each bunch but they were just regular bunches that you would find in any craft store. Plus it really depends on the size of your wreath. Hope that helps. 🙂
This is so very pretty. Nice job.
Thanks so much, I appreciate it!
Great idea for a touch of spring! Can I ask how many bunches of tulips did you have to use to achieve the look?
Thanks so much Mary! As I mentioned in my post, I used 13 bunches to get this look. Hope that helps.
This is such a beautiful wreath! I love the idea of tucking the flowers in the ribbon! I need to try this!
Thanks so much Candice! I didn’t want to mess with glue so I tried using the ribbon. So glad it all worked out.
This is perfect for our door. Tulips are my favorite flower and they just seem to say Welcome Spring. The tutorial looks simple and the pictures made me want to give this one a try. Thanks for the inspiration
Thanks so much Pamela, I appreciate it! This really was a simple project to do. I hope you give it a try. 🙂
What a great way to make a wreath….it is stunning! I think it looks beautiful on your door!
Thanks so much Carol! I’m really loving the pink against the pale turquoise of the door.
This is so beautiful! Thanks for the wonderful tutorial! Happy Easter to you! Leticia
Thanks so much Leticia! Hope you have a Happy Easter!
I had to laugh when you posted your hubby’s comment because that’s the first thing I thought. Kidding aside, it did turn out very nice and very spring looking! Love it, my friend!
He’s not shy about giving his opinion, that’s for sure. Thanks so much MJ! Happy Easter to you!
Gorgeous!! The perfect spring wreath for any front door! And you just taught me a new trick with how you wrapped the wreath with ribbon and tucked the flowers in that way. Genius!
Thank so much! I wasn’t sure if the ribbon would work but the flowers are holding on. 🙂
The colors are great against your front door…and I do love tulips!
Thanks so much Kim! I’m a sucker for tulips, and now I have lots. 😉
When i saw it on fb i didn’t know you had made it. It seems fairly easy,i really like it so i may try, you did a great job.
It was very easy Marlene. I bet you could do it. 🙂 Thanks so much for stopping by to check it out.
Very pretty and definitely Spring looking. I had to pin this for future use on my new front door. I have an offer in on a home and waiting to hear if they accept. I won’t be in for Spring this year but next year for sure. Great easy wreath, just my kind of DIY. Thanks.
Yay, so happy to hear that Debbie! I have my fingers crossed that it will all work out. Good luck! 🙂
I love it. Not in my budget this year. But I pined it, twice. I have boards for Easter and Pink (my fav color).
Thanks so much Rose, and I appreciate you pinning it (twice). 🙂
Your wreath is beautiful on your new door – and you said you were having a hard time being inspired. I don’t think so. Yes, it is pink, but I think about now we all need something as charming as pink to counteract the “blues” we’ve all felt this past winter. I’m so over it!! Come on April……
Thanks so much Pat, I appreciate it! I’m good with projects right now, actually I have so many swimming around in my head, it’s the words for my posts that escape me. Usually it’s the other way around. Just plugging along until I get my mojo back. Hoping for April to come too…along with warm, sunny weather. 🙂
I’m not usually a big fan of wreaths, but I really LOVE this one! Has to be the prettiest wreath I’ve ever seen.
Oh my Leslie, you just made my day! Thanks so much for your sweet comment. I’m glad you liked my wreath. 🙂
Love this! I love tulips. Where did you find your tulips?
Thanks so much Julie! I found my tulips at Michaels. I had a bit of a hard time finding them at first but Michaels had tons.
Love this wreath- I might even make one.Tullips are truly a sign of spring- it’s 5 degrees here today- the warmest day yet this year. Sending love and blessings to you and your family.
Thanks so much Tara! I wasn’t sure about the pink but I love how it turned out. I’ve been enjoying seeing your beautiful painting on FB (love the Deer Grove and June Blooms pieces). So glad that you are enjoying painting again. Hope you are well. Love to you and Don!
I had to pin this! I have a Pinterest “Wreaths” board! Thank you for sharing your tips. I never would have thought to put the tulip stems into the ribbon! ❤️????????
Thanks so much for pinning Sandra! I’m glad you liked my wreath. I didn’t want to mess with glue so I thought I’d try the ribbon. It really worked well and was super easy.