DIY Storage Ottoman
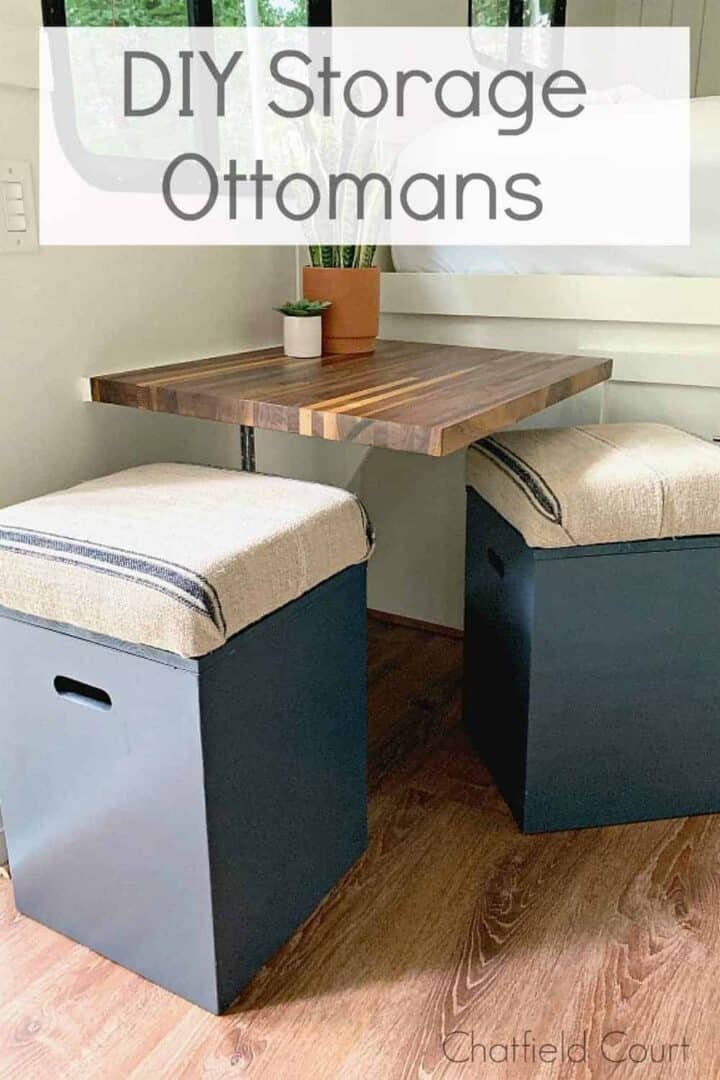
How to build a DIY storage ottoman for a small space that can be used for storage and organization, for sitting and as a step stool.
Roger has done a lot of the projects in the RV that I’m not qualified to do, like the electric and the plumbing, but this project is right up my alley.
I mean, I did my fair share of projects, like the removable kitchen backsplash and my easy no sew curtain, but these storage ottomans were a bit more involved.
There are a lot of things in our tiny space that need to serve many purposes and this is one of them.

We needed stools for the drop-down table that I built but we also needed a step stool to get into our bed and storage is always in short supply.
With all of that in mind, the DIY ottoman came to be.
I had to be very careful about the way they were built.
We needed them to be a specific size so that they fit on the wall next to the drop-down table.
They also had to be the right height so that we could sit at the table comfortably, as well as get in and out of bed without killing ourselves.
A tall order but I was up for the challenge.
I started with a quick sketch and went from there.
I decided to go with a simple box with storage in the middle and a plush cushioned lid that could be removed.
We had to be sure that they were sturdy and strong so that they could withstand our weight and so they wouldn’t move around when we were traveling.
So, with my idea on paper, I started building them using just 4 pieces of pine.
Supply list for storage ottoman (x2)
- 4 pieces of 24 x 48 x 3/4″ pine
- foam for cushions
- quilt batting
- French vintage grain sack
- 4 rubber feet
- wood glue
- sandpaper
- primer
- paint
- wood screws
Tools
- table saw
- brad nailer (love my Ryobi)
- drill
- miter saw
- serrated knife
- palm sander
- oscillating tool (saw)
- framing square
- tape measure
- ratchet straps
- pneumatic stapler
Building an ottoman with storage
To start I ripped each piece of pine on the table saw to 20″ wide, the length of the whole board and ended up with 8 pieces that measured 16 x 20.
Eight pieces will make the sides for both of these upholstered ottomans.
While you’re cutting up the pine for the sides you can also cut both the bottom and top pieces (4 top pieces total).
The bottom pieces measured 14 5/16 x 14 5/16 and the top pieces measured 15¾ x 15¾.

Once all my wood was cut, I set the table saw blade at a 45 degree angle and cut each edge on the long side of the each board.

After all of the panels were cut with a 45 degree angle, they were ready for assembly.

Before I could build the boxes though, I cut the strips for the inside supports of the boxes using some leftover wood.
We needed 8 supports total for both boxes, 4 for each box. For our ottomans, each support measured 1″ x 3/4″ x 18″.
To install the supports, I started 1″ from the top of the box and alongside the miter cut (45 degree angle).
I glued and stapled each support on the four corners.


Next, we assembled the storage boxes by applying glue on the seams of two of the boards.
I also installed the bottom piece of the box (that we cut with the rest of the pine panels).
Each box needed supports around the bottom to keep it square.
I cut 4 strips that were 1″ x 3/4″ x 13 and 4 strips that were 1″ x 3/4″ x 12 3/8″, using leftover wood.
Then I installed the strips on the inside, 1″ up from the bottom edge.
These bottom pieces will basically sit between the 4 corner supports of the box and make a lip around the inside edge to hold the bottom piece of wood.

With the strips in place I glued in and stapled the bottom piece of wood.

Next I assembled the ottoman box and used 2 ratchet straps to hold it together until the glue dried.
I called in the hubs to help me to do this part because it was a lot easier with 2 people.
For this step it was important to work on a flat and level surface so that our boxes were square. It’s very important to get them square.
We also had to be sure that all the edges were straight.
As I tightened the ratchet strap around the box, I made sure I used a square to keep the box square.
Once the glue had dried overnight, I removed the straps.
With the majority of the box complete, I assembled the lid. First, we cut 8 support pieces for both lids with each measuring 1 ½ x 12 13/16.
To keep the lid from sliding off of the box each piece was glued and stapled 15/16″ from the edge of top piece of wood.
How to upholster a storage ottoman
With the lid and basic box complete, it was time to add a cushion.
I bought a piece of high density foam from Joann Fabrics that was 1 ½” thick.
We needed the ottoman to be a step stool into our bed, as well as a comfy place to sit, so I wanted them to be very sturdy.
To get the size I needed I just laid the lid on the foam and traced the outline with a Sharpie.
I used a serrated knife to cut the foam to size, roughly 15¾ x 15¾”, the same size as the top of the lid.

Next, I wrapped the quilted batting over the foam and stapled it on the underside of the ottoman box lid.

Then I cut my fabric to size. I bought a French vintage grain sack 2 years ago at a flea market in California with the intention of using it for a project like this.
It just so happened that this blue striped sack was perfect.
To get it to work though, I did have to take out a seam and cut each piece to fit.
Obviously I had to have extra to wrap around the foam and the board for the top of the box.
I just stapled it along the board, starting in the center and working my way out to the ends.
The upholstered lid to the ottoman would be hiding all of the staples and just plain ugliness so no need to worry about neatness.

Once it was all stapled, I placed my second storage ottoman lid on the underside of the cushion and used 5 wood screws to attach them together.
I was really getting excited about this project after I saw the seats all done with the vintage grain sack, and that was before I painted it.
Speaking of paint, before we tackled that, I added 4 rubber feet on the bottom of both ottomans, in each corner.
I needed each box to be stable and not move around whether we were traveling or stepping on it to get into bed.
After a lot of discussion we settled on round rubber feet that had to be screwed in from the center.

So far, so good. They have worked out well.
The last step was paint. Every other surface, except for the countertop, is painted white so I wanted to add a little color.
Since the grain sack had a stripe of navy in it, I decided to go with one of my fave blue paints, Benjamin Moore Hale Navy.
I had to sand and then paint a couple of coats on each box, and the lid, but it turned out great.
Just the touch of color I was looking for.
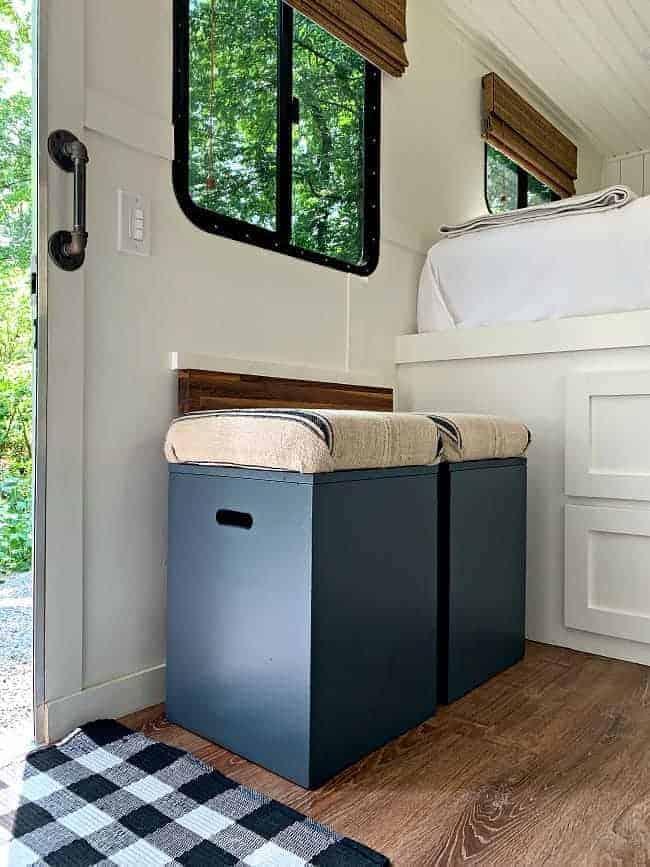
Creating Handles
After using the boxes during a couple of our camping trips I decided that I really needed some kind of handle on them in order to move them.
The boxes sit close together so we needed something low profile.
We decided it was best to cut a hole in each side so that I could stick my hand in to grab it.
It wasn’t the quickest fix but it wasn’t difficult to do.
I made a template of the handle that I wanted and we traced it on 2 sides of each box.
Next, I drilled two holes near the ends of each handle and used an oscillating tool to cut the rest of the handle out.
I sanded each hole well and threw another coat of paint on the sides that we cut.

Now they are perfect and ready to use in our tiny RV, Minnie.

I’m getting a lot of use out of them, too. We’re storing the dog towels, wipes and beach towels in one and our dirty clothes go in the other.
They have also worked out well as a step stool for getting into bed.
It’s a big step but it’s actually better than the step stool that we used in the beginning.
We also love using them when we get ready for the day or for just hanging out and watching out the window.
If we ever need to sit at our fold down table, they will work perfectly with that.
Not bad for a few hours of labor.
I know that not everyone wants to build ottomans with storage, or even has the equipment needed to make them. I totally get it.
We would have been perfectly happy to buy storage ottomans ready-made (believe me, I looked), but we needed a specific size.
By making them ourselves we got exactly what we needed.
Project #378 crossed off the list!
SEE MORE OF OUR DIY FURNITURE PROJECTS
DIY Storage Ottomans for the RV
How to build 2 DIY upholstered storage ottomans for an RV or other small space to use for many purposes. Great for extra seating, storage and as a step stool.
Materials
- 4 pieces of 24 x 48 x 3/4" pine
- foam for cushions
- batting
- grain sack
- rubber feet
- wood glue
- sand paper
- primer
- paint
- wood screws
Tools
- table saw
- brad nailer
- drill
- chop saw
- serrated knife
- palm sander
- oscillating tool (saw)
- framing square
Instructions
- Rip each piece of pine on the table saw to 20″ wide, the length of the whole board, to get 8 pieces that measure16 x 20.
- Cut both the bottom and top pieces. The bottom pieces measured 14 5/16 x 14 5/16 and the top pieces measured 15¾ x 15 ¾. I cut a total of 4 top pieces.
- Set the table saw blade at a 45 degree angle
- Cut each edge on the long side of the each board, 8 cuts for each box
- Cut strips for inside supports of boxes using leftover pine. 8 supports total measuring 1″ x 3/4″ x 18″
- To install the supports, start 1″ from the top of the box and alongside the miter cut (45 degree angle).
- Glue and staple each support on the four corners.
- Assemble boxes by applying glue on the seams of two of the boards.
- Cut and install pieces for bottom of boxes
- Cut 4 strips, 1″ x 3/4″ x 13 and 4 strips that are 1″ x 3/4″ x 12 3/8″, using leftover wood
- Install the strips on the inside, 1″ up from the bottom edge.
- With the strips in place, glue in and stapled the bottom piece of wood
- Assemble box, use 2 ratchet straps to hold box together until glue dries
- Tighten ratchet straps and use framing square to make sure box is square all on sides
- Remove straps after glue dries (24 hrs.)
- Assemble the lid
- Cut 8 support pieces for both lids with each measuring 1 ½ x 12 13/16.
- To keep the lid from sliding off of the box each piece was glued and stapled 15/16″ from the edge of top piece of wood
- Assemble cushion
- Measure and cut high density foam, with a serrated knife, the same size as the lid (15 3/4 x 15 3/4)
- Wrap the quilted batting over the foam and staple it on the underside of the storage box lid
- Cut fabric to size, making sure that you leave enough to fit around the foam and wood lid
- Staple fabric on underside of lid
- Place the top of the second storage ottoman lid on the underside of the cushion, use 5 wood screws to attach them together
- Attach 4 rubber feet on bottom of each storage ottoman (8 total)
- Measure and cut 2 handles in each ottoman using the oscillating tool
- Sand handles
- Sand both storage ottomans
- Prime and paint
Recommended Products
As an Amazon Associate and member of other affiliate programs, I earn from qualifying purchases.