
DIY Barn Wood Shelves
This post may contain affiliate links, please see our policy for details.
Easy to install DIY barn wood shelves are perfect in a guest bedroom, or any room in your home.

We are getting oh. so. close to finishing the 2nd guest bedroom. I’ve already finished the chalk painted cabinet, that got a little makeover, and shared the DIY platform bed that we built.
This week though, it’s all about the DIY barn wood shelves that we installed.
I still have some work to do on the bed but this past week I turned my attention to the next project, filling the one large, blank wall in the room…the wall over the bed. I wasn’t quite sure what I was going to do with it, but when I saw old barn wood planks at the flea market, I knew that we could make beautiful barn wood shelves out of it.
The next dilemma was to figure out how to hang the shelves. I knew that I didn’t want traditional shelf brackets so I took a trip to Home Depot to look for a solution.
Luckily I found just what I needed in the plumbing department. We bought a lot of bits and pieces home but ended up using 6 inch black pipe nipples, iron caps and floor flanges.
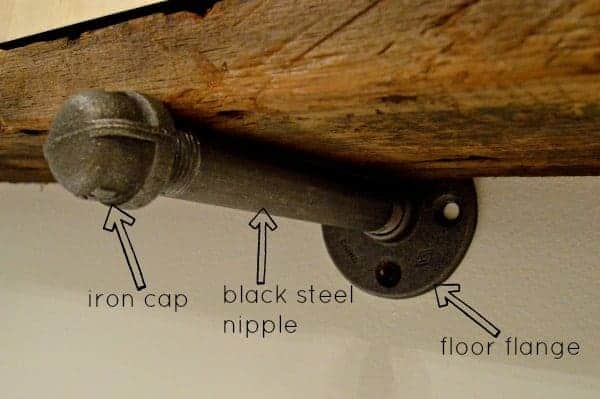
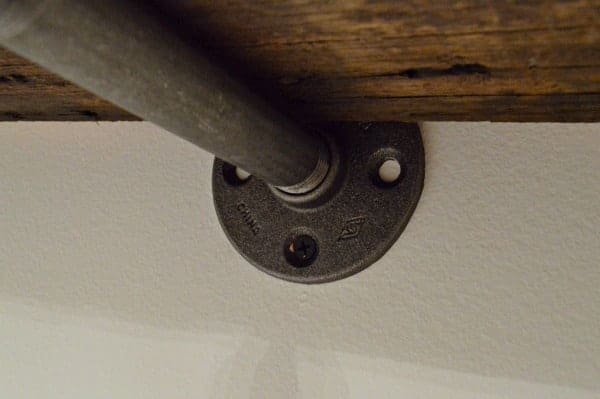
To put the brackets together, we just simply attached the iron caps to each nipple. Then the nipple was screwed into the floor flange, that was screwed onto the wall.
We made sure that we hit a stud when we screwed in each flange to keep the shelves from falling on our guests in the middle of the night. Never a good thing. 😉
I come to find out, after we had it all hung up, that there’s a lot of folks using plumbing parts to hang shelves so my idea wasn’t so original.
Oh well…I like them and they turned out better than I thought (and it was really easy to do) so I guess that’s all that matters. 🙂
BTW, we ended up spending $35 for the pipe fittings and $10 for the large piece of barn wood.

A quick word of caution, you want to make sure you wipe down all the pipe fittings. They are really greasy and can make a real mess of your freshly painted walls (cough, cough…hubs).
Another project to cross off the old to do list. I wish they were all this easy.
What kind of project are you working on now? Easy or not so easy?
CHECK OUT MORE OF OUR DIY FURNITURE PROJECTS HERE!
Thanks so much for stopping by.
Where did you find your blinds in the kitchen and bedroom?
Hi Susanna! If you are asking about the blinds in our Illinois house, they all came from Blinds.com.
I’ve fallen in love with your shelves here. I looked around yesterday for barnwood shelves on local home supply stores in my area and unable to find any. Do you have any ideas where I can find them, especially at those prices?
Hi Sheila! I love the barn wood shelves too. Unfortunately you can’t find them as a set, or kit, in the home improvement store. You can find some on Etsy. Here is one shop that sells them. https://www.etsy.com/listing/230445033/industrial-pipe-shelving-reclaimed-wood?ga_order=most_relevant&ga_search_type=all&ga_view_type=gallery&ga_search_query=barn%20wood%20shelf&ref=sr_gallery_1
Of course they won’t be as inexpensive as if you did them yourself, but it is an alternative. Hope that helps. 🙂
Hey! Thanks for the tutorial on the shelves. It was exactly what I needed in my formal dining room! The hubby was super impressed with how easy they were to install too. Feel free to see how they turned out!
Thanks so much Kim! 🙂
Really cute! I did these kind of shelves in my office and I absolutely love them!
They are awesome, aren’t they Kate? And it’s such an easy thing to do. 🙂
Looking to do shelves like these in my laundry room, except 12 inches deep. Wondering how much weight they would hold? Are yours pretty heavy duty or should I look to do something else?
My shelves were pretty heavy duty, I never worried about them falling. I think that as long as you screw into studs you will be just fine. And if you go long, do 3 supports instead of 2.
I don’t see this question anywhere, perhaps you can help me. I’m doing this exact setup in my kitchen. However, did you get larger pipes than the actual depth of the wood. IOW, for an 8 inch deep shelf, would you recommend a 10 inch pipe, or and 8 inch pipe?
Thanks… trying not to buy things I’ll have to exchange or return. 🙂
Hi Julie. You will have an end cap on the pipe so you may not be able to do an 8 inch pipe with an 8 inch deep shelf. If you want to go the safe route, do the 10 inch but you may end up with a bit of extra space. It should be fine though because, again, you will have the end cap on it. Hope this helps. Good luck with your shelves. I’m sure they’ll look awesome! 🙂
SO SO SO CUTE!
Thank you! 🙂
This is such a great idea! I need shelves in a few rooms of our house but didn’t like anything I was finding in store- this is perfect, thank you!!
-Kelsie
Thanks, Kelsie. I love how our shelves turned out, and they were super easy to do. I’m hoping to do them again in our new house in NC.
Hello! Can you tell me what the paint color/brand you used on the walls? Looks like a gray that has blue in it. Thank you!
Hi, Jackie. The paint used in the guest bedroom is Benjamin Moore Palest Pistachio. In my room, it looks like a very pale gray with a hint of blue. I really love it and would like to use it in my new house!. Hope that helps. 🙂
Oh, I love these so much! That barn wood is just gorgeous and the plumbing parts are the perfect compliment. I need to find a space in my home for some of these. 🙂
Thanks so much. I’m really happy with the way they turned out and they were so easy to put up.
I really want to do these! Hubby will be thrilled with another project 🙂
Ha, I know what you mean. I get the eye roll whenever I tell him about a “great” idea I have. On the plus side, they really are easy to put up.:)
Can you tell me what length of pipe you used to make the shelves? I’m doing this in in kitchen and it’s going to look great but don’t want to make them too wide.
Hi Janet. The pipe I used is 6 inches long and the barn is actually a bit shorter, so it would lay flat on the pipe. I do wish that they were a bit wider, so I could put bigger things on it, but it has worked well. Thanks for your question. Hope my answer helped.
I love the contrast of the rustic shelf with the industrial pipe. I helped a friend make a bookshelf out of similar materials. This would have been much simpler, but she didn’t want to put holes in her walls.
This was such a quick and easy project but I understand her not wanting to put holes in the wall. The bookcase you helped your friend make sounds awesome.
Thanks for stopping in. 🙂
these are really cute and different shelves…here from Cozy
Hi BJ, thanks so much for stopping in and commenting on my shelves. So glad you like them.
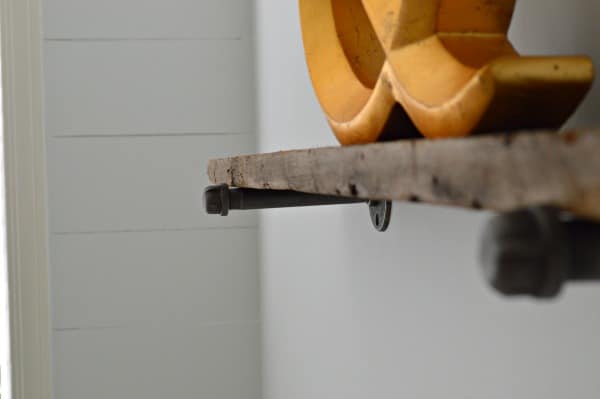
Wow, these are absolutely wonderful! I love that acorn too 🙂
Thanks Deb! The acorn is a particular favorite of mine.
Love these shelves. What did you do to keep the shelf still. Looks like they just sit on pipe. Do you find it stable?
Thanks Allie. They do just sit on the pipe (brackets). The wood is old barn wood so it’s pretty solid and heavy and it lays flat. We’ve not had any problems with it. Hope this answers your question.
Where did you get the barn wood from?
Hi Molly. I got the barn wood from Kane County flea market. Hope that helps.
I have some great unfinished, unpainted reclaimed wood, but don’t know how to treat it – stain? oils? waxes? – to get the look you have there. It’s quite rough and splintery/fuzzy, but I don’t want to do so much to it that it loses that rustic look. What did you do for these shelves?
Actually the only thing I did was to clean them. I vacuumed them off and then used some Murphy’s oil sop to clean it up a bit. I wanted to keep the rustic look of them so that’s as far as I went. Maybe you could just very lightly sand any rough spots you don”t like (very lightly). Hope that helps.
Thanks, I’ll try that! Good to know that less is more.
Where did you find all the fittings for $35? I just went to Lowe’s yesterday to get the stuff for a project similar and the pieces to attach to the floor were $7 for the 1/2 and $10 for the 3/8, needed 12 so def going to be more than $35 and that is not all the supplies……………to do 3 shelves on each side of my TV (total of 6) is going to cost me almost $140, no lumber included.
Hi Rob. As I stated in the post, I bought all of my fittings in Home Depot. The black nipples were $2.07 each, the flanges were $4.92 each and the caps were $1.34 each. Multiply each by 4 and you will get $33.32 (I also ended up spending $10 for my barn wood). I’m not sure why Lowe’s was so much more but even if you go online to the HD website, you will be able to get fittings for the prices that I paid. Hope this help you with your project.
Thanks.
K.
Wow big diff will def go by HD and see. Thanks!!!!!
No problem Rob. It does seem like a big difference. Best of luck with your project.
love the shelves but cant’ stop looking at that acorn! where did you find it?
Thanks Denise. I bought that acorn at a little shop in Macon, Ga about 10 years ago. All the kids used to love playing with it so the stem has been glued back on quite a few times. LOL
K.
We did something very similar a few weeks ago … we used 3/4 inch flanges, pipes and caps. I will caution you: shop around .. 3/4 inch flanges are a whooping $11.48 each in Lowes .. I stopped by a local plumbing supply store and they had them for just over $3.00 .. $8 cheaper! EACH!
Wow Sharon that is a huge difference. You have to wonder how they can get away with charging so much. Thanks so much for the head’s up. 🙂
K.
Love, love, love your shelves! They’re beautiful.
Thanks so much Shannon. I’m loving how they turned out too. Appreciate you stopping by and commenting.
K.
Very cool idea, looking for something for my sons room and I love this!! 🙂 ~Kim
Thanks so much Kim! It really is such an easy project to do too. Appreciate you stopping by. 🙂
K.
Kristi I love the rustic look of these shelves – that wood is amazing in it’s natural state and looks soooo.ooo great with the plumbing parts. I would love to do something like this in my son’s room – thank you for sharing how you did it!! And thanks for linking up to Best of the Nest. I hope you link up again next month…..I’ll be curious to see what you’ve been working in your guest room. Off to check out that platform bed!!
Thanks so much Lisa! It was really an easy project and I’m really loving the results.
It’s my first time joining Best of the Nest and I appreciate all you ladies hosting. It’s been fun looking at all the great links. Appreciate you stopping by and commenting. Happy weekend! 🙂
K.
Great look and you made it seem really easy! Thanks for sharing with the Thursday Blog Hop!
Thanks so much Pam and I really appreciate you ladies hosting Thursday Blog Hop every week.
K.
Love those shelves! I’m definitely adding that to my pile of maybes for the shelves we’re planning above our breakfast bar!
Found you at the Thursday Favorite Things link-up!
Beth at LWC Wonderland
Thanks Beth! I love them even though it’s not what I thought I would put on that wall.
So glad that you found me at the Thursday Favorite Things link-up. Thanks for stopping by.
K.
These are so cool. I love the barn wood. Right now i am painting a china cabinet with homemade chalk paint.
I’m loving barn wood right now too Trish. I just painted a cabinet with chalk paint too…good for you for making your own. What color are you using? Would love to see the results.
Thanks for visiting and sharing your latest project. I love to read about what everyone is up to.
K.
Love the rustic and industrial shelves! So simple but makes a big impact.
Thanks so much Susan So glad you like them.
K.
I LOVE these!! I have plans to put up similar shelves in our guest bathroom when we finally get around to it!
Thanks Lindi. I was surprised how easy they were to put up. Good luck with yours. I’m sure you’ll love them too. 🙂
K.
I love these, what a fabulous idea. The industrial look is so on point at the moment. Thanks tons for linking to Inspire Me.
Thanks so much Marty and thanks for hosting Inspire Me each week. Love coming to your party!
K.
Your shelves turned out great! Love the look of the barn wood with the plumbing bits, gives the shelves a cool industrial vibe.
Thanks. I’m loving them too and they were so easy to do.
I appreciate you stopping by and commenting.
K.
I love your shelves and just shared them on my Facebook page!
Thank you, thank you Paula! 🙂
K.
Wow, very resourceful. Love them!
Thank you Sue! 🙂
K.
Boy, those are some industrial shelves you have there, partner! Guess I’ll just mowsy on out of here and plan on catching up on some of my chores this coming weekend.
Busy weekend and I was tired, tired, tired!!!
I’m sure you were busy last weekend but it sounded fun.
As always I appreciate you stopping in to say hi and share what you are doing. 🙂
K.
Well I was going to start setting up my quilt room this weekend but the finish of the floor took longer than anticipated. Now everything is coated in fine dust and saw dust. So I guess I will be cleaning a room a day this week. No fun at all. Enjoy your week.
No fun Deborah but I’m sure it will be great when it’s all done.
Thanks for dropping in and hope you have a great week.
K.