
Amazing Cargo Trailer Conversion to Tiny RV
How we turned an empty cargo trailer into the ultimate tiny RV camper for camping adventures.
After more than a year and a half we are finally ready to say that our cargo trailer conversion is done and ready for the road.
We knew what we wanted it to look when we started on this enclosed trailer conversion journey, but seeing our vision go from paper to reality is beyond exciting.

There’s a video with a complete tour that you can check out on our YouTube channel (link at the end of the post).
We’re also offering a 2D floor plan of our completed cargo trailer conversion.
Deciding to build a cargo trailer camper
We’ve been camping our whole lives, first with our families when we were growing up and eventually with our girls as they were growing up.
Actually, Roger and I met while camping with our families when we were teenagers so camping is sort of in our blood.
When we moved to Florida several years ago we bought a pop-up and camped in that for a few years. Then we moved to Illinois camping took a back seat.

Once we moved to North Carolina, where we are today, we decided that we wanted to camp again.
This time though, we were going to create exactly what we wanted.
We’ve always wanted to build our own camper but we both had two very different ideas on how to do it.
I wanted to buy a cute little vintage trailer, and Roger wanted to buy a cargo trailer or utility trailer.
It took a couple of years to convince me but I finally leaned his way. The tipping points were water damage and a bathroom.
We looked at several old, used RV’s before we settled on the cargo trailer idea. Every trailer that we looked at had water damage, a common problem in older RVs.
We could definitely fix it but didn’t want to deal with those kinds of issues.
I wanted vintage and we looked at those too, but many smaller RVs don’t have bathrooms, or room for a bathroom.
Not having a bathroom was a deal breaker for me so, regrettably, we moved away from vintage trailers.
We also looked at new RVs. Actually, we looked at a lot of new RVs.
They just don’t build them very well anymore, and they’re pretty expensive.
We knew that we could do better so I conceded to the hubs and we went and ordered a cargo trailer.
Can you turn a cargo trailer into a camper?
Absolutely! It just takes work…a lot of work actually.
Before you get to work though, you need to get a cargo trailer.
Buying a cargo trailer
Before you even start your conversion though, you’ll have to find a cargo trailer.
There are a lot of different brands and price ranges so make sure you do a lot of research before you get a trailer.
Cargo trailers can be bought used or from a dealer.
Our trailer was ordered to our specifications from a trailer dealer.
We ordered ours with 3 RV windows installed, an RV door with a window, 7′ ceilings and gray colored metal on the outside.
Cargo trailers either come with barn doors on the back or with a ramp door.
We chose to go with barn doors.
Even with the addition of a few upgrades, we came in way cheaper than a typical RV. All we had to do was to build it up to fit our needs.
Easy, right?

We waited 6 weeks for our trailer to be built and brought it home to begin it’s 2 year long transformation.
Cargo Trailer Floor Plan
This was an early layout of our 112 square foot space. It ended up looking very similar to this, except for the placement of the shower and toilet.

I had to concede my trailer choice for a utility trailer but Roger also had to make concessions.
He was fine slapping a mattress and a/c in there and calling it a day.
Ummm….that was not ok with me.
I agreed to a cargo trailer but it had to look good, like a real RV, and it had to have a bathroom. I wasn’t willing to give up on either issue.
Finally, after all of the planning we were ready to start building.

Installing a White Tongue and Groove Ceiling
The first project that we tackled was the ceiling. We insulated it and installed tongue and groove planks.
We’re old pros at installing tongue and groove ceiling planks and have discovered that it’s important to find a good (and inexpensive) source for materials.
While we were installing the ceiling we also went ahead and wired the ceiling for 12 volt lighting.

DIY platform bed with storage
Next, we built a simple platform bed with storage drawers underneath.
We built a similar DIY platform bed a few years ago for a guest bedroom so we knew that it was something that worked well for us.
There are slight differences but the concept is the same…box construction and spaces for storage.

A shiplap wall was also built to separate the back barn doors and offer more stability for the bed.
Installing an RV Air Conditioner
We were anxious to go camping so our next project was the a/c. We decided to go with a dual hose portable unit so that we didn’t have to cut a hole in the ceiling (hello, water!) or the side.
Before we installed it we did a little experiment with a single hose vs. dual hose a/c. You can check out the video, here.
With the a/c up and running, we threw a mattress on the platform and took our first camping trip.
We learned a lot from that first little weekend away. It helped us to figure out what we needed and what we didn’t.
It also gave us the motivation to keep going.
Vinyl plank flooring installation
The next project was the LifeProof vinyl plank floor installation.
We discussed painting the wood floors but in the end, we went with planks.
I’m glad that we chose them.
They look great and have held up well with the dogs (plus, I didn’t have to paint them).

While we were doing the floors, I got busy painting the walls. Oy…I lost count of the coats that I had to put up. I think it was 4 or 5.
In other words…a lot of paint.
It did wonders for the inside though. So light and bright!

With the walls and floors complete, we moved on to framing out the rest of the king size platform storage bed.
We built the drawers for storage and moved on to the kitchen.
Building an RV Kitchen
In order to separate the kitchen from the bathroom, we had to build a wall. Then we framed out our cabinets and prepared them for the countertop.

We had gotten our hands on a 12′ slab of walnut for the countertop but it had to be refinished before it could be installed.
It took me two weeks of working on it every day to get it ready and waterproofed.

Finally, the walnut butcher block countertop was installed with a new stainless steel sink and faucet. Doesn’t the countertop look pretty? Love the wood grain!

Running Electric in a Cargo Trailer Camper
Besides the 6, 12 volt disc lights on the ceiling, we also installed 2 sconces over the bed and a flush light over the kitchen sink.
You don’t only have to use RV lights in your cargo trailer, you can either DIY your own unique lights or install regular fixtures.
The lights we installed are just normal light fixtures that you would see in a house. I just added a 12 volt bulb to each one so that we could run it off of battery if needed.

Roger also ran electric for the a/c, refrigerator, several outlets, including light switches next to the bed and by the door, and an exhaust fan for the shower.
Running the electric took a few weekends to complete but it went smoothly.
Next, we installed the plumbing for the kitchen sink, the toilet and the shower.
We didn’t add any tanks to the RV so we are not self-contained, but we can still camp at campgrounds with hookups.
Maybe someday we’ll add the equipment needed to go boondocking, but we’re just looking to get away for weekend trips.
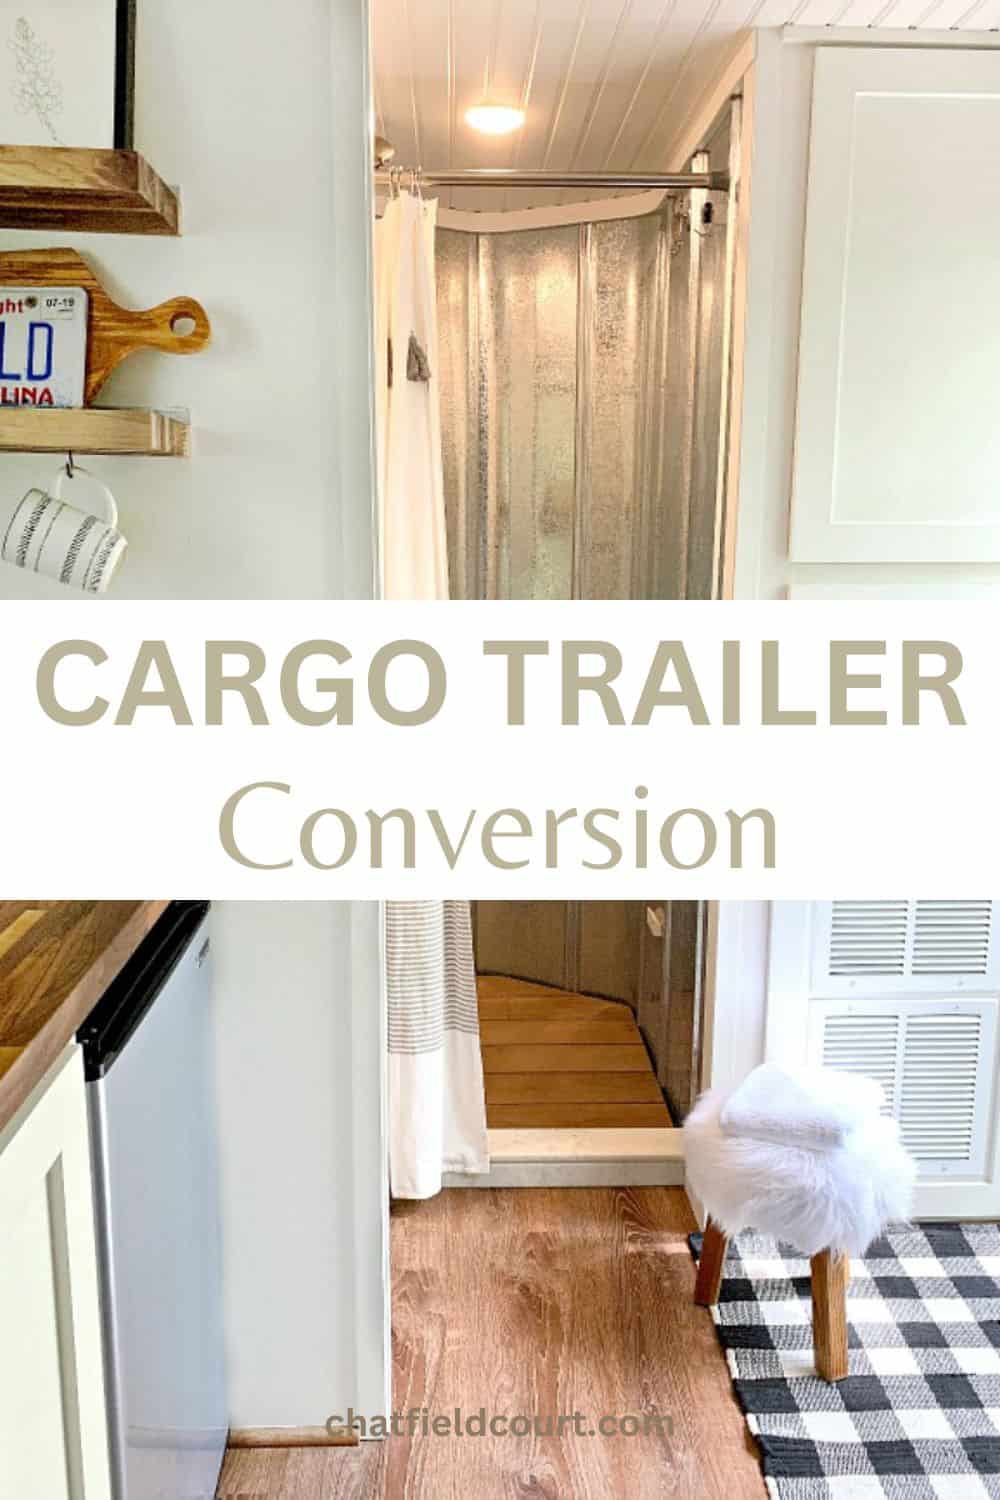
Building an RV bathroom in the V-Nose
Building an RV bathroom from scratch is no easy task.
You need to consider plumbing, electrical and space.

This part of the build was tough. A lot of discussion and planning went into it so that we had a working shower that was watertight, and a toilet.
Not an easy task when you have to build everything custom.
We placed the shower in the v-nose (front of the trailer) and carefully built it from scratch.
Once the walls went up and the floor was in, we waterproofed everything with 7 coats of Red Guard.

Next, we installed the corrugated metal, the marble threshold and the shower head.

Finishing up the Cargo Trailer Conversion
The cargo trailer was ready to use but we had some finishing touches to complete.
I installed our 3 new window coverings for privacy, room darkening woven bamboo shades.
I also built a pair of DIY storage ottomans.
The storage ottomans are triple duty, serving as extra storage space, seating for our drop-down table and a step stool for the bed.

While I was busy with my projects, Roger was busy installing the new RV toilet and plumbing.
As you can see we don’t have a vanity and sink but the kitchen sink is sufficient for our needs.

After we finished the plumbing we worked on the finishing touches which included cabinet doors and all of the trim.
Remember, every piece is custom and that includes the cabinet doors and ceiling trim.
What a difference they made in the space. The new doors and drawer faces brought everything together.

RV Kitchen Backsplash
Next, I installed the removable wallpaper backsplash in the RV kitchen.
There are several options for RV kitchen backsplashes that are available. You could just paint the backsplash and be done or you could install removable tiles, tin squares or removable wallpaper.
The removable wallpaper I chose was super easy to put up and it will be easy to remove, when it’s time.
I also added 2 storage shelves from the leftover walnut butcher block that we used for the kitchen countertop.
As you can imagine available counter space is at a premium in a small RV. For this reason we chose not to install a stove.
Instead we use an induction cooktop that we bring with us, as well as a grill, so cooking a proper meal hasn’t been an issue.

The last project was the trim around the ceiling and on the wall that we built to separate the kitchen and bathroom.
We had every intention of installing a door for the bathroom but decided that we didn’t want to close in our already tiny space.
Instead of a door we chose to install a DIY RV privacy curtain using a swing arm curtain rod.

Decorating an RV
The final step was to decorate with a few well-chosen accessories.
When you travel with an RV everything needs to be secured or put away so you need to keep that in mind when decorating.
I wanted to make our trailer feel more welcoming and comfortable so I added a few pillows, a macrame wall hanging and a couple of faux plants.

Installing an RV awning
If you’re looking to have an awning on your cargo trailer there’s a few options for installation.
It can either be installed by the factory building the cargo trailer, a shop or self-installed.
We chose the budget route and installed the awning ourselves. It took the two of us about 8 hours to install.
I wouldn’t say that it’s a hard project to do but you are working high in the air with a heavy object so it is a two person job.

Even with the awning installed, we still have a few projects on the outside to finish up, like caulking the windows and door, but Minnie is more than ready for action.
We’d like to go boondocking at some point so we’ll eventually have to add a generator and black or gray water tanks.
Those projects are way down on our “someday” list and not something that we’re worried about doing right now.
How much does it cost to convert a cargo trailer into a camper?
Every cargo trailer is unique in design and build so price will vary from camper to camper.
Our build cost around $13K for everything. That amount includes the price of the trailer and all of our building materials.
The bulk of that amount was spent on the trailer, lumber, the a/c and the awning.
Of course all of the work was done by the two of us so there was no expense there. And it was all totally worth it in the end.
A brand new RV trailer would have cost so much more and it would not have been as custom, or built as well.
We’re thrilled with the way our RV turned out and so excited to go on lots of adventures.
Don’t forget to head over to our YouTube channel to check out the video tour and q&a video where we answer viewer questions.
And check out our 2D floor plan that we’re offering (after a ton of requests).
Cargo Trailer Conversion Sources
- Wall sconces and flush light over kitchen – Amazon (similar)
- Macrame wall hanging – Etsy
- Walnut butcher block (used for countertop, shelves and table) – Floor & Decor
- Flooring
- Kitchen backsplash – Loomwell
- Dometic RV toilet
- Woven window shades
- Kitchen faucet, shower head, robe hooks and toilet paper holder
- Cabinet pulls
- Awning – Carefree of Colorado
- Portable A/C
