• Skip to primary navigation
  • Skip to main content
  • Skip to primary sidebar
  • Skip to footer

Chatfield Court

  • Home
  • About
    • Meet Kristi
    • Home Tour
      • House Tour – North Carolina
      • House Tour – Our Illinois Home
    • Contact
    • Advertise
  • DIY Project Gallery
    • DIY Projects
    • RV Renovation
    • Kitchen Remodel
    • Crafts
    • Outside Projects
  • Interior Decorating
    • Decor
    • Small Space Living
    • Organization
    • Shop My House
  • Recipes

Where to Find Primed Tongue and Groove Ceiling Planks

Monday,May 9, 2016 By Kristi 36 Comments

Sharing is caring!

Where to find budget-friendly primed tongue and groove ceiling planks for a kitchen ceiling.

Since we installed the primed tongue and groove planks on the kitchen ceiling during our remodel and in our RV renovation, I have been getting so many comments and emails asking about the source for the planks. Today I thought I would update the post a bit and share the info on where we got ours.

pile of tongue and groove planks on floor in white kitchen

This post may contain affiliate links which won’t change your price but will share some commission.

Before we started working on the ceiling, I did a lot of research, as per usual for me, on what would be best to use for the kitchen ceiling. The biggest takeaway I got from all that research was to use primed tongue and groove planks and I’m so glad that we followed that advice. Not only did it save our necks and backs, but it also saved us a ton of time.

Pre-primed tongue and groove planks installed on the ceiling during a recent kitchen remodel, and where we found them. chatfieldcourt.com

Getting info online proved to be the easy part. Actually finding the wood planks in a store was almost impossible. We went to every store in our area that sold lumber until we walked into our local Home Depot and hit the jackpot.

They had primed tongue and groove pine planks in 8 and 12-foot lengths…exactly what we were hoping to find.

Below is what the display looked like in the store. You’ll note that the side showing in the store display looks different that the plain sided planks on the ceiling.

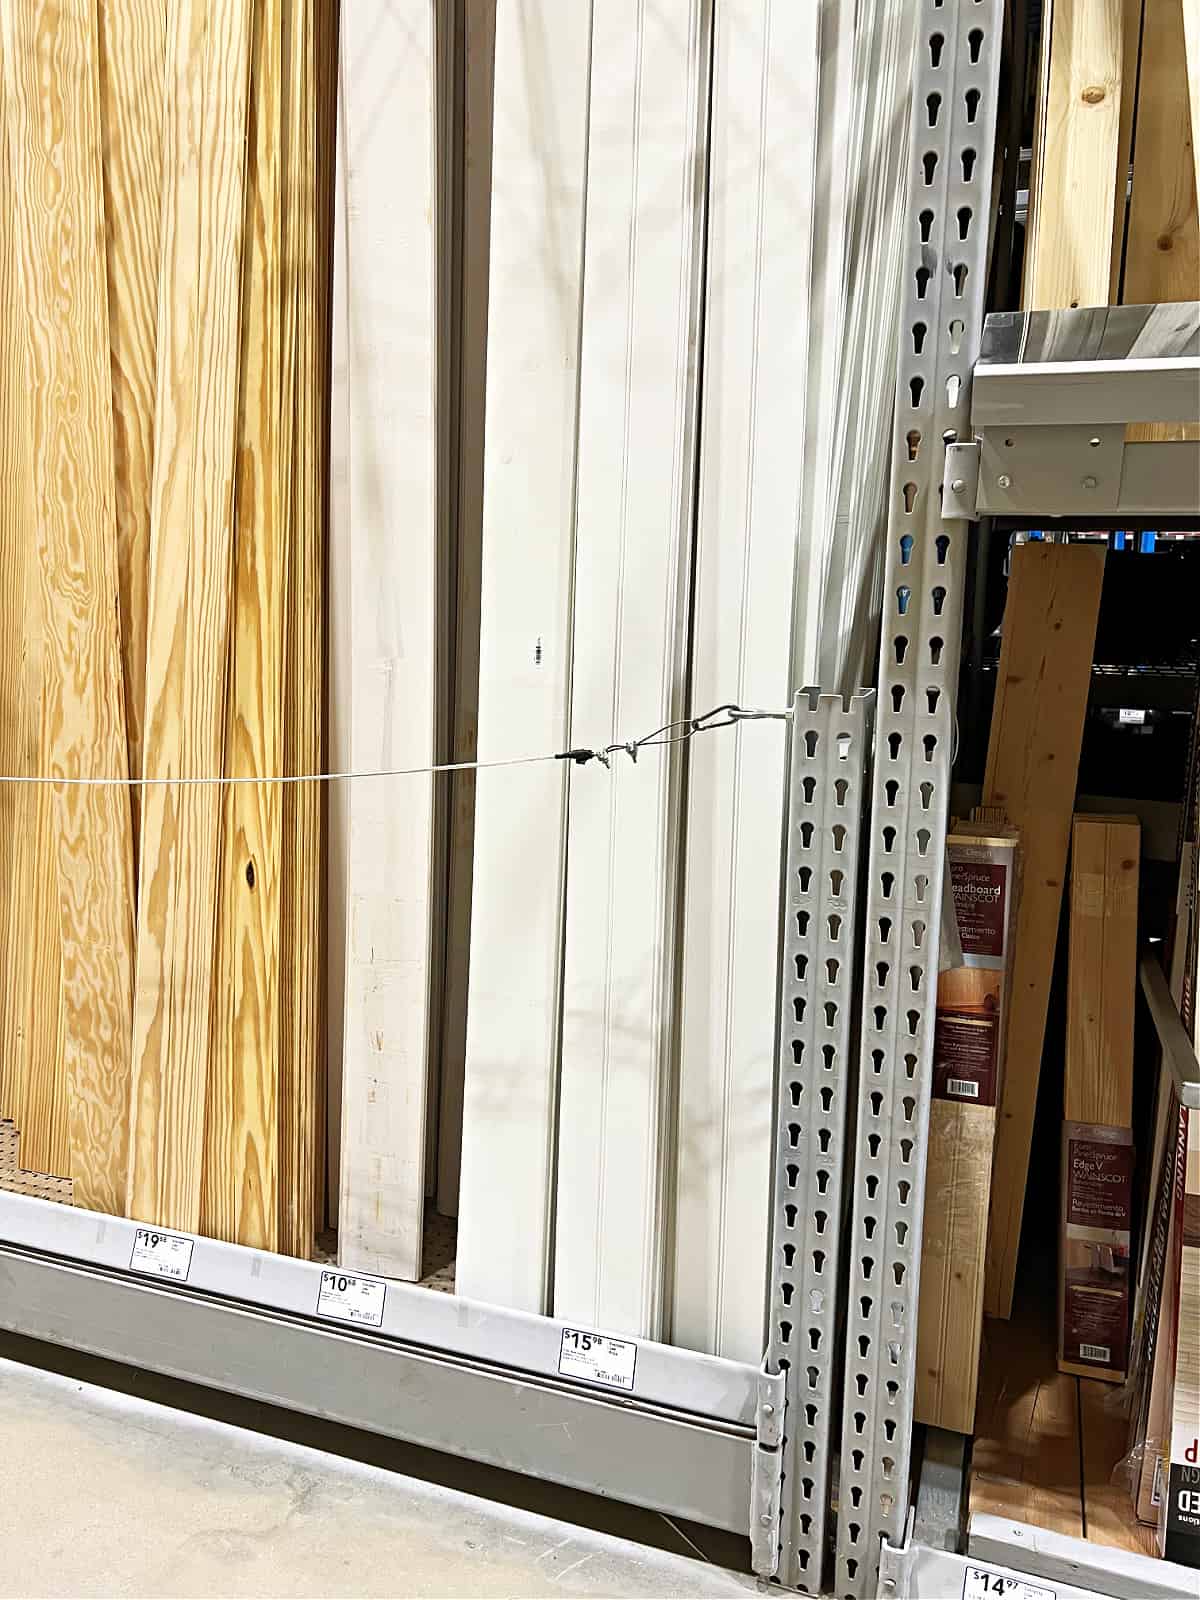
I’ve gotten a lot of comments and emails about this so I will say that it is, in fact, the same board. It simply has two sides (I talked more about it in this post). We went with the plain side for our ceiling because it was the look I was going for.

Pre-primed tongue and groove planks. Why we used them for our kitchen ceiling and where to find them. chatfieldcourt.com

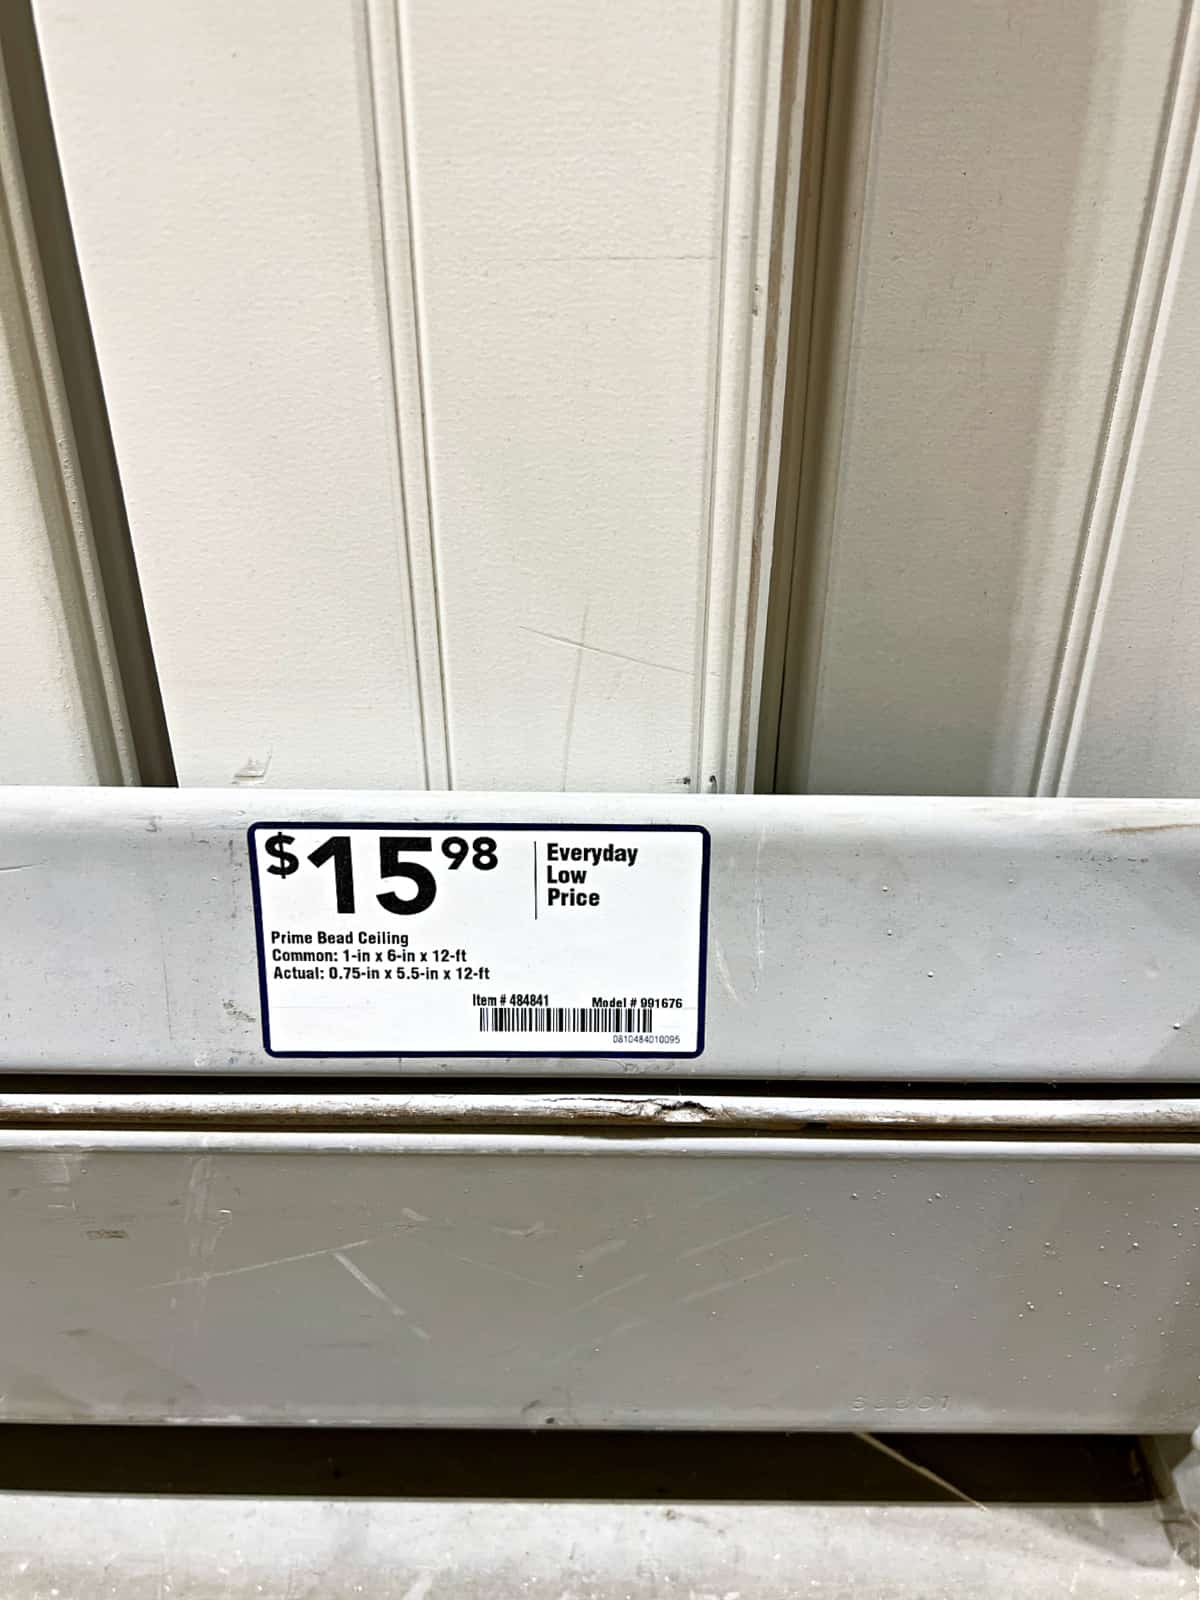
I’ve often heard people saying that the tongue and groove wood planks that they have been able to find have been very expensive. I thought the ones that we got were very reasonable. We spent about $275 just for the planks for our 13’x 8′ kitchen. All of our planks and supplies were bought at The Home Depot.

Where to find pre-primed tongue and groove pine planks for a kitchen ceiling. And they won't break the bank! chatfieldcourt.com

Painting it was literally a pain in the neck, but it wasn’t the worst job ever. We kept saying that we were so happy that we spent the extra money on the primed planks the whole time we painted. The primed planks were well worth the few extra dollars. 

Pre-primed tongue and groove planks installed on the kitchen ceiling. chatfieldcourt.com

A little extra tidbit…

I did find a few spots where a small amount of sap seeped through. To cover them up I just added an extra coat of paint over it and it looked fine. It may seep through again but, honestly, you can’t tell. I just noticed because…well, I’m weird like that.

I would stand there and practically stand on my head to look at spots on the ceiling at different angles and in certain light but a normal person walking in there probably wouldn’t notice. The mister didn’t, but I could shave my eyebrows off and he probably wouldn’t notice. Ok, bad example. Seriously, the sap spots weren’t a deal-breaker for me. I just wanted to let you know that it could happen.

Pre-primed tongue and groove planks installed on the ceiling during a recent kitchen remodel. chatfieldcourt.com

The ceiling turned out so much better than we thought. I would love to do another one in our new house in North Carolina….fingers crossed.

I hope that this little bit of info helps you out. Let me know if you’re able to find any pre-primed tongue and groove planks in your area. I’d love to pass the info on.

UPDATE 3/2018 – I still get a ton of emails and questions about the tongue and groove planks that we used. I just wanted to update you and let you know that these planks are still available in our local Home Depot stores. We are actually getting ready to use them again and our local stores had plenty of inventory. I hope you find this useful. 

A SECOND UPDATE  5/2018 – We just completed another tongue and groove wood plank ceiling in our RV, or our little home away from home, with the same material. We used the other side of the plank this time if you want to check it out.

You can find the tutorial on the tongue and groove plank ceiling here…

Tutorial for installing a tongue and groove plank ceiling in the kitchen. chatfieldcourt.comTongue and Groove Plank Ceiling Tutorial

Or see the whole kitchen remodel reveal here…

From dark to light and bright, a small kitchen remodel reveal. chatfieldcourt.comKitchen Remodel Reveal

Sharing is caring!

About Kristi

Kristi here…lover and doer of all things DIY, home improvement, home decor, and quick and easy recipes. I’m the voice behind Chatfield Court where I share the budget-friendly DIY projects, crafts and decorating tips in the hopes of inspiring others that they can do it too.

Previous Post: « 7 Great Gray Paint Colors
Next Post: New House Tour »

Reader Interactions

Comments

  1. Nic

    Tuesday,November 20, 2018 at 8:58 am

    Did you acclimate the planks before installing them? Have you had any shrinkage issues?. I’m doing these in a kitchen in Florida and don’t know how long 9th for they need to acclimare. Thanks

    Reply
    • Kristi

      Wednesday,November 21, 2018 at 12:10 am

      Hi Nic. If you read the post on installing the ceiling, I talk all about bringing them in the house to acclimate them.
      We also didn’t notice any shrinkage with the planks. I can’t speak of how they are doing now, as we moved out of the house, but for the year we were there they were fine. Good luck with your project.

      Reply
  2. Lonna Murn

    Thursday,May 31, 2018 at 7:43 am

    Thank you for responding so quickly. I will absolutely let you know how it works for us. With so many different products on the market today it can be overwhelming at times trying to make a decision. All of your projects turned out AMAZING, and I can only hope it’s as easy for us as you and your husband make it look! Keep up the good work and thanks for the inspiration.

    Lonna

    Reply
  3. Lonna Murn

    Wednesday,May 30, 2018 at 6:05 am

    I looked for your ceiling material here at my local HD and I’m hoping this is the same product you used but I can’t say for sure because here the cost is $10.82. I was hoping you would be able to verify it is the same brand/product. You and your husband did an outstanding job and I’m hoping to have the same outcome in a 1928 Craftsman Bungalow remodel. Here is the info on the planks they sell here at my local HD:

    Seller 1” x 6” x 144” Radiata Pine Primed Finger-Joint Edge and Center Bead Panel. The model # ECB1612.

    Thank you so much!

    Reply
    • Kristi

      Wednesday,May 30, 2018 at 9:26 pm

      Hi Lonna. I looked up the info that you sent me and it does appear to be the same product we used on our ceiling. We just used it again in our RV remodel. We really liked working with it.

      Hope this helps. Good luck with your remodel.

      I’d love to hear how you like this product.

      Reply
  4. Bethanie

    Sunday,May 13, 2018 at 12:19 am

    Love your ceiling! Planning on doing a plank ceiling in the kitchen of our new build. Trying to figure out what style of edge to go with. Do your boards have a v groove? We’re getting unfinished planks, and trying to decide between a v groove edge, or a nickel gap. Any suggestions? We’ll be painting them white. Thanks!

    Reply
    • Kristi

      Sunday,May 13, 2018 at 2:00 am

      Hi Bethanie! Thanks for stopping by and checking out our ceiling. It was one of my favorite things from our old kitchen. We just did another install of the planks in an RV we are converting. Here is the link if you want to take a look.
      Anyway, to answer your question, we just used shiplap for the first time in our RV conversion. It wasn’t nickel gap but true shiplap. I honestly didn’t care for it. Nickel gap, as well as shiplap, only has one side to hide brads so it’s a bit trickier to secure. We preferred the v groove, hands down. Especially for a ceiling. I think nickel gap would be better for a wall.

      Can I recommend the pre-primed boards if you can find them (especially if you’re painting them anyway)? It was the best thing we did. It saved us loads of time and made it easier to paint. Painting boards on the ceiling is not fun.

      Good luck with your project. I hope you love it as much as I love mine. 🙂

      Reply
  5. Danielle Faust

    Monday,April 9, 2018 at 12:25 pm

    Menards in my area (N.E. Wisconsin) carries these as well… possibly the Lowe’s too.

    Reply
    • Kristi

      Tuesday,April 10, 2018 at 3:53 am

      That’s great info, thanks Danielle! The Lowe’s in our area has planks as well but there are some slight differences. I still prefer the Home Depot ones but that’s just my personal preference.

      Reply
  6. Danna Jones

    Wednesday,February 28, 2018 at 11:05 am

    January 2018. We are told by HD that this is no longer available.

    Reply
    • Kristi

      Thursday,March 1, 2018 at 10:20 pm

      Thanks for the info Danna. It’s strange that they would tell you that. We were just in our local Home Depot looking at it for an upcoming project last week. It’s still available here.

      Reply
  7. Matthew Hansen

    Friday,December 1, 2017 at 1:17 am

    Wouldn’t it have saved a lot of trouble to blind nail it instead of screwing, filling, priming, and painting the holes?

    Reply
    • Kristi

      Friday,December 1, 2017 at 1:47 am

      We didn’t fill, prime or paint any holes. We only used screws where they would be hidden. They were just there for a little added security. The brads we used were all hidden on the tongue of the plank.

      Reply
  8. Kristin

    Wednesday,October 18, 2017 at 2:43 pm

    I’m confused as well. The pic from Home Depot of the boards are not the same boards that are on your ceiling. The boards on the shelf at Home Depot that you have a pic of are a beadboard plank tongue and groove and your ceiling is just plain tongue and groove plank without the beadboard look. Theres a raised ridge (bead) in the pic of the product on the shelf at Home Depot and there is not that same bead/ridge on your ceiling planks. I’m afraid you may have taken a pic of the wrong product.

    Reply
    • Kristi

      Thursday,October 19, 2017 at 12:21 am

      Hi Kristin. No, it is the correct product. If you read the post on installing the ceiling (at the end of the post you’re commenting about), you’ll see a picture of both sides of the planks. One is smooth, the side I used, and the other is like bead board. The photo I shared is the same exact product from the same store we bought it from. Hope that helps.

      Reply
  9. Dane

    Monday,August 7, 2017 at 10:48 pm

    Nice post thx. Growing up in Minnesota I had the pleasure of painting over a lot of knotty pine. For those ready to try your strateg trying to prevent bleed through, a shellac based primer (one brand is BIN) helps greatly.

    Reply
  10. SHAUNA SMITH

    Thursday,June 22, 2017 at 11:19 pm

    I used tongue and groove wood thru out our whole downstairs of our house, love the look! Only thing I would recommend is when buying your wood try to get pieces of wood with as little knots as possible. I used “Kilz” (suppose to hide any blemishes) but knots still come thru 1 coat of Kilz and 2 coats of paint. I am now painting again, this time I’m using high gloss paint it’s thicker than satin! Plus I have put another coat of Kilz/primer. Love ,love,lovethe high gloss paint !

    Reply
    • Kristi

      Friday,June 23, 2017 at 7:12 pm

      That is the downside to putting up a plank ceiling using tongue and groove (unless you’re going for that look). Thanks so much for sharing your process for hiding them. Glad you found a solution.

      Hope you have a great weekend!

      Reply
  11. Sam

    Friday,May 19, 2017 at 1:06 pm

    The planks you sjhow here on the home depot shelf are not what you installed. Am i missing something here?

    Reply
    • Kristi

      Friday,May 19, 2017 at 6:23 pm

      Hi Sam. We actually used the planks in this post on the ceiling. I used an old piece of barn wood for the shelf. I assume you are referring to either the kitchen shelf or the bedroom shelves?

      Reply
  12. Tracy

    Tuesday,May 10, 2016 at 3:43 pm

    Yes. I am still working on doing this project but I have to tell you again….yours is the BEST example. I have pinned this a million times and will continue to do so cause I love it that much. Thank you again for sharing.

    Reply
    • Kristi

      Wednesday,May 11, 2016 at 3:18 am

      Awwww, thanks so much Tracy, for pinning and for your sweet comment. 🙂

      Reply
      • amanda

        Wednesday,June 21, 2017 at 1:32 pm

        My house came with a “wood pank” ceiling, at least we thought so. Turns out its a very pretty ceiling tile! I don’t know where they found them but they do exist if anyone would rather go that route

        Reply
        • Kristi

          Friday,June 23, 2017 at 7:09 pm

          Wow…nice. Thanks so much for sharing. 🙂

          Reply
  13. Lela

    Tuesday,May 10, 2016 at 11:04 am

    This ceiling looks beautiful! And the pre-primed option is perfect for me because I HATE painting and I’ll pay extra to skip a step. I’d love to invite you to share a few of your gorgeous blog posts at my Inspiration Thursday link party on my blog inthenewhouse.com. We start on Wednesday nights at 9pm EST and party all day Thursday. I hope to see you there!

    Reply
    • Kristi

      Wednesday,May 11, 2016 at 3:17 am

      Thanks so much Lela. The pre-primed planks were definitely the way to go. I’ll be sure to stop over to your party.

      Reply
  14. Carol, The Red Painted Cottage

    Monday,May 9, 2016 at 6:21 pm

    Thank you for sharing this source! There’s two walls that I would love having shiplap, but the thought of all the work that many go through when making the inexpensive way, makes me exhausted just thinking of it. I would love to get actual planking ,and to have them preprimed would be awesome.

    Reply
    • Kristi

      Wednesday,May 11, 2016 at 3:15 am

      You’re welcome, Carol. The pre-primed planks would look awesome on a wall too. I may have to try that out myself. 😉

      Reply
  15. Erin - Suburban Simplicity

    Monday,May 9, 2016 at 5:01 pm

    Looks like it came together beautifully! My husband is making some inexpensive shiplap for me as I speak. Can’t wait to see the finished product!

    Reply
    • Kristi

      Wednesday,May 11, 2016 at 3:13 am

      Thanks Erin! I’m sure you’ll love your shiplap. I’ll be sure to check out your finished project.

      Reply
  16. Vel

    Monday,May 9, 2016 at 1:37 pm

    Thank you for sharing your source!

    Reply
    • Kristi

      Tuesday,May 10, 2016 at 3:10 am

      You’re welcome, Vel.

      Reply
  17. Kim

    Monday,May 9, 2016 at 11:39 am

    I know that your new house will be super fabulous! Ps- gotta love Home Depot!

    Reply
    • Kristi

      Tuesday,May 10, 2016 at 3:09 am

      Thanks, Kim. Love Home Depot! 🙂

      Reply
      • Sharon

        Monday,September 10, 2018 at 2:15 pm

        Hi, Do you know if it’s possible to do this over a tile ceiling?

        Reply
        • Kristi

          Friday,September 14, 2018 at 2:54 am

          Hi Sharon. What kind of tile ceiling are you referring to?

          Reply

Leave a Reply Cancel reply

Your email address will not be published. Required fields are marked *

Primary Sidebar

Follow us!

Meet Kristi!

Check out our Cargo Trailer Conversion on our YouTube channel – over 200K views!

Footer

Join our Newsletter!
  • Privacy Policy
  • Disclosure

Copyright © 2019 · Chatfield Court

Join our newsletter!
~~Chatfield Court~~ Sign up to get the latest on our DIY projects!
Your information will *never* be shared or sold to a 3rd party.
Join our Newsletter!