
DIY Fireplace Mantel
This post may contain affiliate links, please see our policy for details.
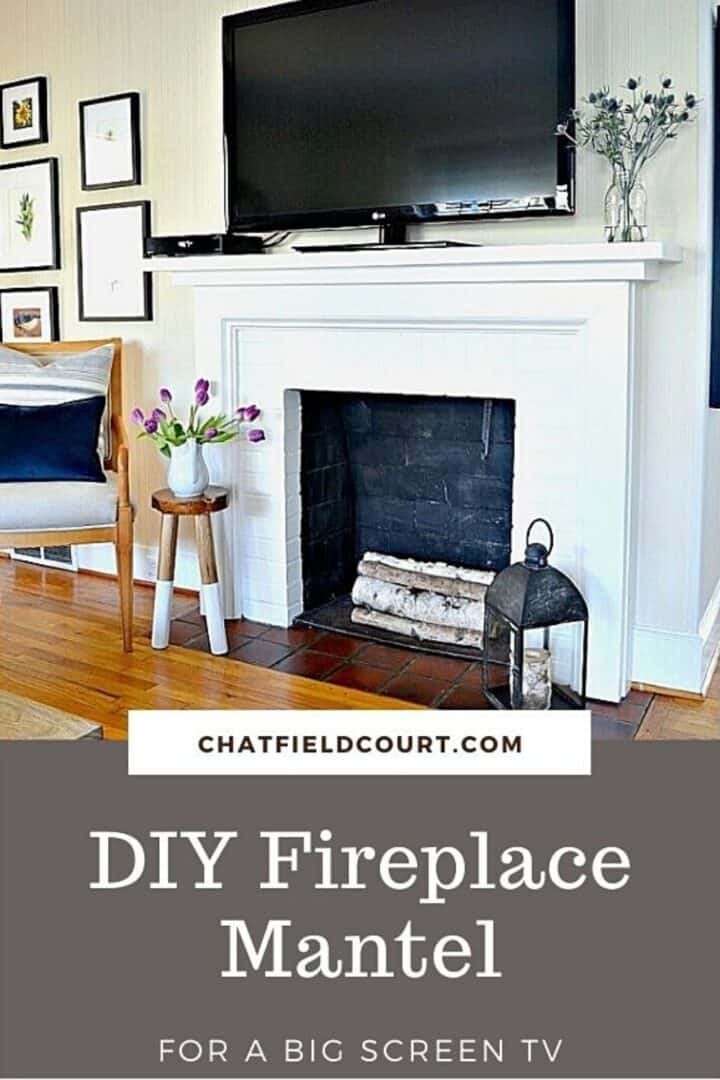
A DIY fireplace mantel makeover for a old and narrow mantel, using a piece of pine. An easy project to make room for a big screen TV in a small living room.
We are moving right along with our projects.
I still have 500 going at once, and my house is currently a disaster zone, but we are making progress.
It’s slow but it is progress.
Today is all about the DIY fireplace mantel we built, while we continue working on painting the brick fireplace surround.

I haven’t shown this side of the living room very much because it was just plain ugly.
We had to do a rough modification on the mantel when we moved in so our TV would fit.
We’ve finally finished this one and I’m so ready to share.

The tv placement was a huge discussion between the hubs and me when we first moved in (although every project seems to be a huge discussion). 😉
The previous owners had a tv on a small stand next to the fireplace but it just wouldn’t work for us.
We did throw around the idea of hanging it on the wall above the fireplace but the hubs didn’t want to do that.
With no other choice we had to go with the tv on the mantel.
The only problem…and it’s a big one…was that the mantel was too narrow for the TV.

Unable to come up with a simple solution, we used a rough cut piece of plywood that was wide enough for our tv to sit on the existing mantel.

Since this is the only spot in this room for a tv, we were going to have to make this work.
This is what it looked like for 6 months while we searched for an inexpensive solution.
Not pretty but real life.

In the end we decided to try to beef up the mantel with a wider and longer, solid piece of reclaimed wood.
The goal was to make it look like it was always there while giving our tv a place to live.
We didn’t need fancy moldings or corbels, we just wanted to preserve the original look and keep it simple.
I looked everywhere to find a piece of budget-friendly, solid reclaimed wood that was thick enough, long enough and wide enough.
Everywhere we went, we looked.
After a few months we knew that if we were going to get a thick solid piece, it would have to be new wood from a lumber yard.
Definitely more money than we had planned on spending but it was our only option left.

With a new plan I went searching our local lumber yard.
I found a beautiful piece of white pine, exactly what we needed. It seemed thick enough so it wouldn’t warp (fingers crossed) and wide enough for our tv.
DIY fireplace mantel supplies
- piece of white pine, or other sturdy wood
- tape measure
- wood screws
- caulk
- sandpaper
- paint
- drill
How much does it cost to build a fireplace mantel?
The cost was a bit more than I wanted to spend but the lumber yard planed and smoothed it out for us which meant less work.
In the end it was well worth the $91 we shelled out.

Installing a wood mantel
Since our piece of pine was already cut to size, we just had to attach it to the existing mantel using some well placed screws from underneath the old mantel to the new.
No ugly screw holes to fill and it’s very secure.
Next I caulked, primed and painted, with leftover trim paint.

Now the new mantel looks like it’s always been here.
Plus the big screen tv fits perfectly.
I still don’t love the tv sitting on the fireplace mantel, but when you have a small house with limited space, you make do.

Finn’s favorite pillow in his favorite spot. I think he loves the fireplace.

We may have finished the mantel but the rest of the fireplace is still a work in progress.
There’s more painting to do and we need to build a DIY fireplace screen with birch slices.
We’re also hoping to give the fireplace an update with vinyl tile stickers.

As far as the mantel goes, I think we accomplished our goal.
Have you ever built your own fireplace mantel?
