
DIY Accent Wall
How to add style to a room with a hand painted DIY accent wall. An inexpensive alternative to wallpaper.
Our guest bedroom/studio is the last room in the cottage to get painted.
This small space is only used by me for crafting and small projects so it was last on the to-do list.
When I started this room I knew that I wanted to do something different with the walls. I tossed around the idea of hanging wallpaper, and even looked at some samples, but I didn’t want to spend a lot.
If you’ve ever wallpapered a room before then you know how expensive it can be.
So…
I came up with a fun, easy and inexpensive way to create a kind of DIY accent wall that I would paint myself. I guess you could call it faux wallpaper.

We have a unique window nook in this room so I knew that it would be the perfect place to try a feature wall treatment idea.
Now that I figured out the “where” part, I had to figure out what to do.

What is the best way to paint an accent wall
Keep it simple and practice!
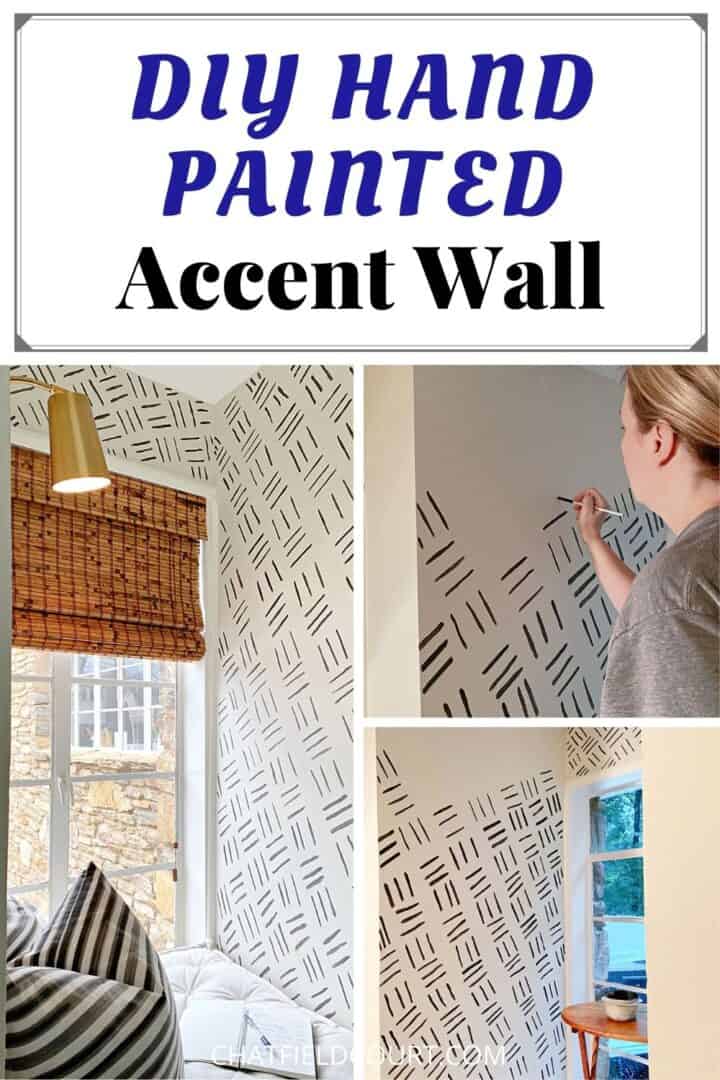
I’m not an artist so I knew I had to keep it simple. My design of choice turned out to be lines. Other easy paint designs for walls could be dots, dashes or strokes.
To come up with a pattern for my lines I used cardboard from a box and practiced different techniques.

I hand painted some lines in different configurations and even tried making lines with a template made of string and a block of wood.
Hand painting gave me a little more control so after practicing for awhile I moved over to the nook to begin.
Supplies to create a painted accent wall
- chalk
- small artist’s brush
- clean damp rag
- base paint for wall
- paint to create accent wall
I’ll admit that I was nervous to start and I stood for the longest time just staring at the wall.
What if it didn’t look good?
What if I did all three walls and it wasn’t what I’d hoped it would be?
A lot of what if’s so I took a step back, a deep breath and tried to rethink my plan.
After giving it some thought I decided to cheat a bit on my design and use some chalk.
Yup, chalk!
I found a piece of white chalk and began creating my accent wall design before I painted anything.
I started at the ceiling, on the left side of the wall, and worked my way right.
What I quickly learned was that in order to get the look I was going for, I needed to line up my blocks of 3 lines so that they moved down the wall on a diagonal.
This was purely preference on my part and what seemed right to my eye.

There was a lot of erasing (by way of a clean, damp rag) but once I found my groove, it went quickly.
After I finished chalking one wall I began painting my lines, using a dark gray paint that I had left over from another project.
I simply painted right over the chalk line using a small artist’s brush.
Once in a while I would need to wipe the chalk off of my paintbrush so I kept a clean rag handy.
Other than that, the chalk worked well and I was able to quickly paint the wall with no mistakes.

I’m not an artist so the look I was going for wasn’t perfection.
I wanted it to have a handmade look and that’s what I got, although I will admit that it took time for me to accept the imperfections.
After the first wall was done I moved on to the window wall and then the last wall in the nook.

The original plan was to do the whole room but I decided that the nook was more than enough and it made my paint design special.
To finish the nook I hung a brass reading light, installed a new woven shade on the casement window and added a cushion and pillows.
Now it’s the perfect little spot to sit, relax and write notes in my notebook every day (yes, I’m old school).

With the window nook done I moved on to the rest of the room.
I painted the other walls with the base color I used in the nook and painted the doors (see Bedroom Sources at the end of the post).

I laid a seagrass rug and set up an old artist’s desk for my craft projects.
It truly feels like my own creative space where I can work, craft…and relax.

Now that I embraced the handmade aspect and imperfections of my bedroom accent wall, I really love it.
It’s one of a kind…and it was inexpensive to create.

Bedroom sources
- accent wall paint – Benjamin Moore Wrought Iron
- base paint – Benjamin Moore Halo
- brushed brass wall sconce
- woven window treatment – Malay Oak
- window seat cushion
- striped pillows
What a beautiful and creative idea, Kristi. You are so talented. Thank you for sharing your ideas and I sure hope your husband feels better very soon.
Thanks so much, Meegan! Roger is doing well after his surgery, thanks! Just taking it day by day to heal and get back to work.
love the idea of just doing the window seat nook! and chalk!
Thanks Linda! Yes, I think just doing the nook was the right call for this room…and for me. 😉
It looks great, hats off to you for trying such a big project.
Thanks so much, Anita! Not a project I would normally try to tackle but I really enjoyed it (once I got over my nerves 😉 ).
Oh, this turned out so well!!! Love how it adds a pop of fun.
Thanks so much, Libbie! It definitely adds a pop of fun to the room. Perfect for a working studio space. 🙂
Beautiful job! Very time consuming but I a good way! It’s great for the brain. I truly enjoy projects like this.
Thanks so much, Maria! Once I figured out the chalk trick it went pretty quickly but it was definitely enjoyable to do.
Great job! I wish I had the courage to try painting my hand!
Thanks Marty! Yeah, I’m so glad that I gave it a go but I definitely had to pull on my big girl pants to do this one. 😉
The accent wall turned out great. It added some character and dimension to the nook.
Thanks Denise, I appreciate it! I love that it adds a hand-made element to the room.
I would totally do this on a wall. I love, love, love how it turned out and the inexact spacing makes it for me. It looks gorgeous Kristi
Thanks so much, Michelle! I really had to embrace the imperfect nature of it but I really do love it. 🙂
Love this! I did similar in my kitchen foyer area though like your design better. Give thought to doing that whole wall as it will add even more impact – not the whole room – just that full wall…………don’t think you will regret it. And I agree about wallpaper…….lovely and yet can be pricey. Awesome job!!
Thanks Julie, I appreciate it!
I love this!!! Such a great way to accentuate that little area of the room which I’m sure is now the focal point.
Thanks for sharing:)
Thanks so much, Maria!
WOW!! what a terrific idea .So simple and so perfect . You are one smart cookie . Love your doable ideas . Hope your Hubby feels better soon .
That’s so nice! Thanks so much, Susan!!!
Looks great, really creative. Hope your husband gets better.
Thanks Marlene, I appreciate it!
I really love the little nook you created. Using the chalk to make the pattern was genius!
Thanks Gail! The chalk definitely made it easier to commit to paint. 😉
Chalk – Terrific idea
Hope Roger fully recovers
Thanks Gail, I appreciate it!