
Hydrangea Wreath DIY
An easy to do hydrangea wreath DIY using dried hydrangeas from my own garden. A beautiful fall wreath to hang on your front door.
When we moved into our little stone cottage four years ago there was nothing but azaleas planted all around the house. I love azaleas but I really wanted hydrangeas so I’ve been adding one or two into my garden garden every spring.

Four years later and I have 6 hydrangea bushes scattered around the front and side flowerbeds.
I’ve kept an eye on them each summer but for one reason or another, we never got a lot of nice flowers. Not like I’d hoped anyway. Not until this past summer.
I’m not sure why this was our year but I’m not going to complain. All but one of our hydrangea bushes produced flowers. Big beautiful flowers!

I cut a few flowers here and there over the summer but left most on the bushes. As the summer progressed I watched them slowly change colors and start to dry.
My goal was to pick them to dry and make a fall wreath out of them. I’ve never dried hydrangeas before so I experimented a little and found what worked for me.
When to cut hydrangeas to dry them?
I read that you should let your hydrangeas dry on the plant before you pick them, usually between August and October. Mine weren’t quite dry when I picked them (in late August) but it didn’t take long for them to dry once they were cut.

What is the best way to dry hydrangeas?
I didn’t do anything complicated to dry my hydrangeas. I simply cut them off the bush (leaving a couple of inches on the stem), removed all the leaves and placed them in a basket.
They sat in our dry, cool basement for a week or so before I started making my DIY wreath. I’m not sure this is the correct way but it was easy and it worked for me.
With the flowers cut and dried, it’s time to stat making a fall wreath.
Supplies to make a dried hydrangea fall wreath
- grapevine wreath
- dried hydrangea flowers
- floral wire
- wire cutters
- pruning shears
How to make a dried hydrangea wreath
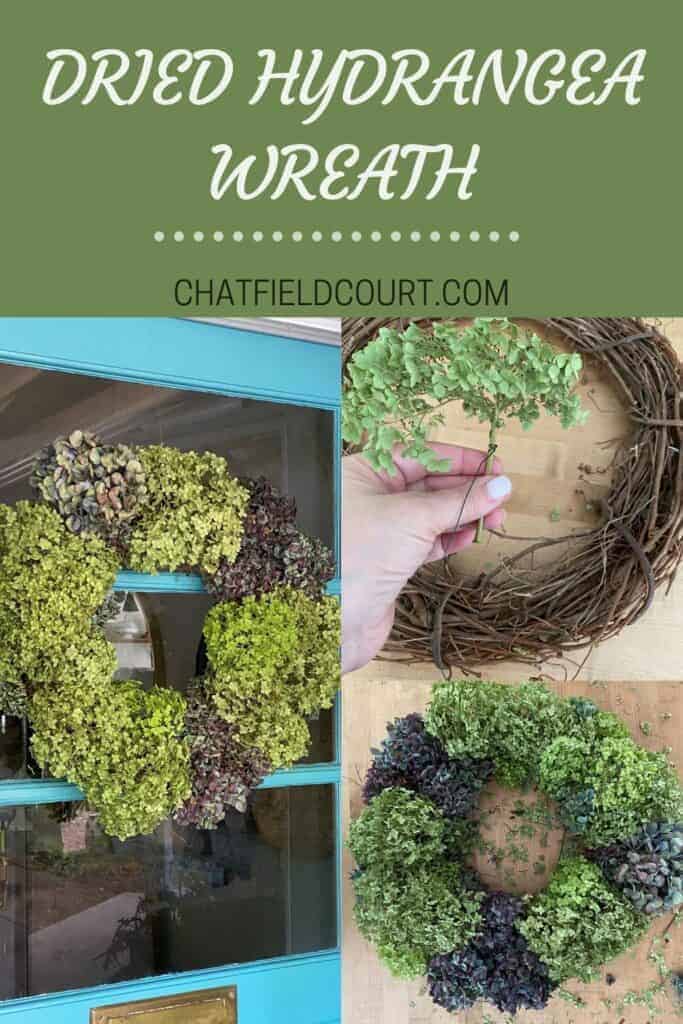
I had a big basket of different color and sized blooms so I started my project by separating the dried flowers and placing them around the grapevine wreath.
I just wanted to get an idea of what flowers I would use and where they would go.

After I determined the layout, I used the wire cutters to cut 6″ lengths of floral wire to wrap around the flower stems.

Next, I made a hook for my wreath with a piece of thicker gauge wire.

With the hook attached, I started wrapping all of the flower stems with the floral wire. This is the reason why you want your stems a bit longer when you cut them off the plant.
You can always trim them shorter with your pruning shears if they’re too long.
I experimented as I went along and found that wrapping one end of the wire around the stem several times and leaving the rest of the wire to wrap around the grapevine wreath worked best.

Once I wrapped all the stems with wire, I started putting the wreath together.
There was no rhyme or reason to the placement of the flowers, I just worked my way around the wreath. There were two different colors of hydrangeas so I tried to sprinkle them around.
I used all of the dried flowers I had but still had a couple of bare spots that needed to be filled in. I went out and snipped off a few not-quite-dry hydrangeas off the bush.
The fresher hydrangeas were definitely easier to work with and filled in the bare spots nicely.
After hanging on the front door for a few days they dried completely and looked like the rest of the flowers.

If you’ve ever worked with dried hydrangeas then you know they can be delicate.
I had quite a mess after the wreath was done but the flowers still looked full and beautiful.

Once the wreath was hung on the door, the flowers stopped dropping. A couple may fall once in a while if the door hits the entryway bench but it’s not bad.
Which leaves the question…
How long will dried hydrangeas last?
They should last indefinitely. You can’t touch them or the flowers will fall off but otherwise they will last forever. I have some in a crock that I got 2 years ago.
They still look as good as they did when I got them.
If you want to try to preserve the blooms you can try to use hairspray. I’ve never given that theory a test but you could certainly try.
So what do you do with your hydrangea blooms? Have you ever made any fall decor with them?
Happy fall, y’all!

Check out my other DIY fall wreath ideas…
Dried Hydrangea Wreath
How to make a dried hydrangea wreath using flowers from your own garden. An easy project to do to add a touch of fall to your front door.
Materials
- grapevine wreath
- dried hydrangeas
- floral wire
- 18 gauge wire to make hook (optional)
Tools
- pruning shears
- wire cutters
Instructions
- Several days before you make your wreath you need to cut your hydrangea blooms, leaving a few inches of stem, and strip the leaves
- Leave blooms in a cool dry space to dry
- When you're ready to make your wreath take your dried hydrangeas and position them on the grapevine wreath (just to get an idea for placement).
- Using wire cutters, cut one 8" piece of floral wire for each hydrangea
- Wrap each hydrangea stem with wire, close to the bloom
- Use the pruning shears to cut stems if they're too long
- Before you start attaching flowers to the wreath, make a hook with heavier gauge wire and attach it to the back
- After flowers have been wired and trimmed, start attaching them to grapevine wreath by wrapping the end the wire around the wreath
- Work your way around wreath
- When all the flowers are attached, check for any bare spots and fill with smaller flowers
- Hang wreath
- Enjoy!