
How to Make a Cutting Board from Scrap Wood
How to make a cutting board from scrap wood and an old leather thrifted belt.
Some people go to stores like HomeGoods and Target to look at pillows, lamps and pictures. You know…home decor goodies.

Me?
I love to check out wood cutting boards, the chunkier the better. I don’t usually buy but it’s always fun to see what they have.
So…what could possibly be better than buying a beautiful chunky cutting board from the store? How about making your own.
I got to do just that with some leftover walnut butcher block from our cargo trailer conversion kitchen countertop install. Actually it’s the kitchen sink cutout and it was going to go in the scrap pile.
No scrap pile for this piece…I was able to rescue it and turn it into the perfect cutting board/serving board for just a few bucks.

Creating a butcher block cutting board
So…I had a beautiful (and free) piece of wood but I wanted to kick it up a notch and add some kind of handle.
I saw a picture online of a really cool looking cutting board that had leather handles so I used that as my inspiration.
How to find leather handles though when I was trying to stay on a budget?
I went to the home improvement store and the fabric store but couldn’t find what I wanted. Feeling defeated I made one more stop at the thrift store.
I was looking for something…anything…and stumbled on an old leather kid’s belt for just $1. Score!!!
With a leather belt all ready to be reused and my free wood, I set out to make my new thrifty butcher block with leather handles.
Since the wood was already cut out all I had to do was give it a good sanding. First I worked on the top, bottom and sides of the board with a medium grit sand paper, and then moved on to a fine grit.
When I was done the wood was smooth and soft.

The above picture is me sanding the board with the handles already attached. Ideally you want to sand and condition before the handles are attached. It just makes the job easier.
After the board was sanded, I used a clean cotton cloth to remove all of the fine dust.
Then I used a food-safe butcher block wood conditioner to treat the wood.
This is where the magic happens because it brought out the beautiful grain in the walnut.
A quick note…just be sure to follow the directions on any wood conditioner you use and make sure it is food-safe (if you will be using it to serve or cut food).

After the wood conditioner soaks in and dries, you can add the handles.

Or you can stop right there. You have a beautiful free cutting board that’s all ready to go.
I still had that inspiration cutting board on my mind, with the leather handles, so I cut the belt up to make two handles for my board. After I shaped the handles I used some good old-fashioned soap and water to clean the belt (careful not to soak the leather and ruin it).

Then I predrilled holes in each side of the wood.

To attach the leather, I screwed 4 small brass wood screws into the predrilled holes.
Look at that beautiful leather. Who would guess that it came from a $1 thrift store belt?

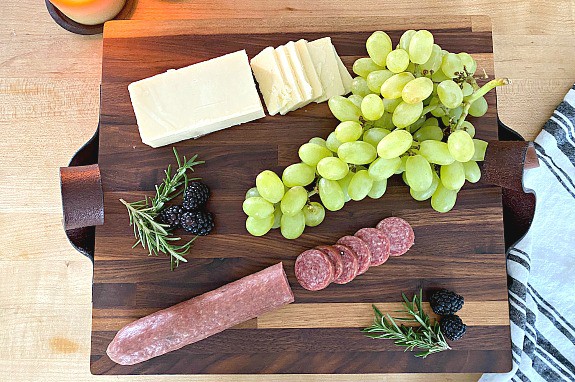
Once the handles are attached, our new chunky cutting board/serving board is done.
Not only is it done but it only cost us about $3.50 to make.

Not a bad price for a beautiful chunky cutting board. Actually, I think it’s better than anything I’ve ever seen in the store, and I didn’t have to pay big bucks for it.

Check out my other great idea for repurposing a kitchen sink cutout.
How to Build a Bathroom Vanity

How to Make a Cutting Board from Scrap Wood
How to make a beautiful DIY butcher block cutting board from a piece of scrap wood and a $1 thrifted leather belt.
Materials
- old leather belt
- piece of butcher block countertop
- brass wood screws
- wood conditioner
- clean cotton cloth
- soap and water
Tools
- drill
- scissors
- medium and fine grit sand paper
Instructions
- Take sink cutout from butcher block countertop, or any leftover piece of butcher block or regular wood
- Sand top bottom and sides of butcher block first with medium grit sandpaper, then with fine grit
- Wipe wood down well with clean cloth
- Take new clean cloth and wood conditioner and apply to top, bottom and sides of wood cutting board (follow directions on bottle)
- Let wood conditioner dry
- Take old leather belt and cut in 2 pieces for cutting board handles
- Use warm soap and water to clean leather (careful not to soak leather)
- Center leather handle in the middle of the side of the cutting board
- Drill pilot holes through leather and into wood
- Take brass screws and screw into pilot holes in leather and wood (I used 2 screws or each side of handle
- Repeat on opposite side of cutting board
Recommended Products
As an Amazon Associate and member of other affiliate programs, I earn from qualifying purchases.
