
DIY Clothes Rod for a Closet
How to make a DIY clothes rod for your closet with a scrap piece of copper. An easy DIY project that gives you hanging space for clothes in a small closet.
One of the biggest projects to date in our little cottage was the new bedroom closet, as well as a brand new tiny powder room that we created out of a small bedroom closet.
I was happy to have all of the big projects done, like the pretty wallpaper, but one small detail was missing. I needed something in the new closet that would hold our wet, clean clothes so they could easily dry.
My solution was to use a sliding clothes rod.

I had the idea to put one in the closet way before we started the powder room construction. I just never got around to it.
Why do you need a sliding clothes rod?
To hang wet laundry on to dry.
You know…those delicates that can’t go in the dryer.
Our laundry is in our unfinished basement so I’m always schlepping my delicates upstairs to hang them to dry. The problem is that we only have 3 tiny closets in the whole house.
They’re all filled to the max right now so there’s no good place to hang them.
That’s where a sliding clothes rod comes into play.
I started looking but never pulled the trigger. The ones I found online seemed pretty pricey and they were way too short for my needs.
There just wasn’t a lot of room on the store-bought versions to fit several hangers.

Not finding what I wanted online, I decided to make my own custom rod.
A quick trip to the home improvement store and I came home with all the makings for a custom copper pipe sliding clothes rod.
Some of the supplies I already had on hand, like the spray paint, wood screws and a 5′ piece of pipe, so it only cost me a few bucks for copper tube straps and a cap.
Supplies
- 3/4″ copper pipe (60 inches in length)
- 4, 3/4″ copper tube straps
- 3/4″ copper tube cap
- pipe cutter
- #8 flat washers
- 3″ wood screws
- file
- drill
- copper spray paint

Making a sliding closet rod
Step #1
I had to use wood screws and washers, and I knew they would be visible so I gave them a quick coat of copper spray paint.
Once they were dry I was ready to start installing my sliding rod.

Step #2
The first thing we had to do was to determine the length of the rod. We did this by taking the measurement from the back wall of the closet to the outside trim.
With the measurement taken I used a pipe cutter to cut the copper pipe down to size. I used the file to smooth the cut end and remove the burrs.

Step #3
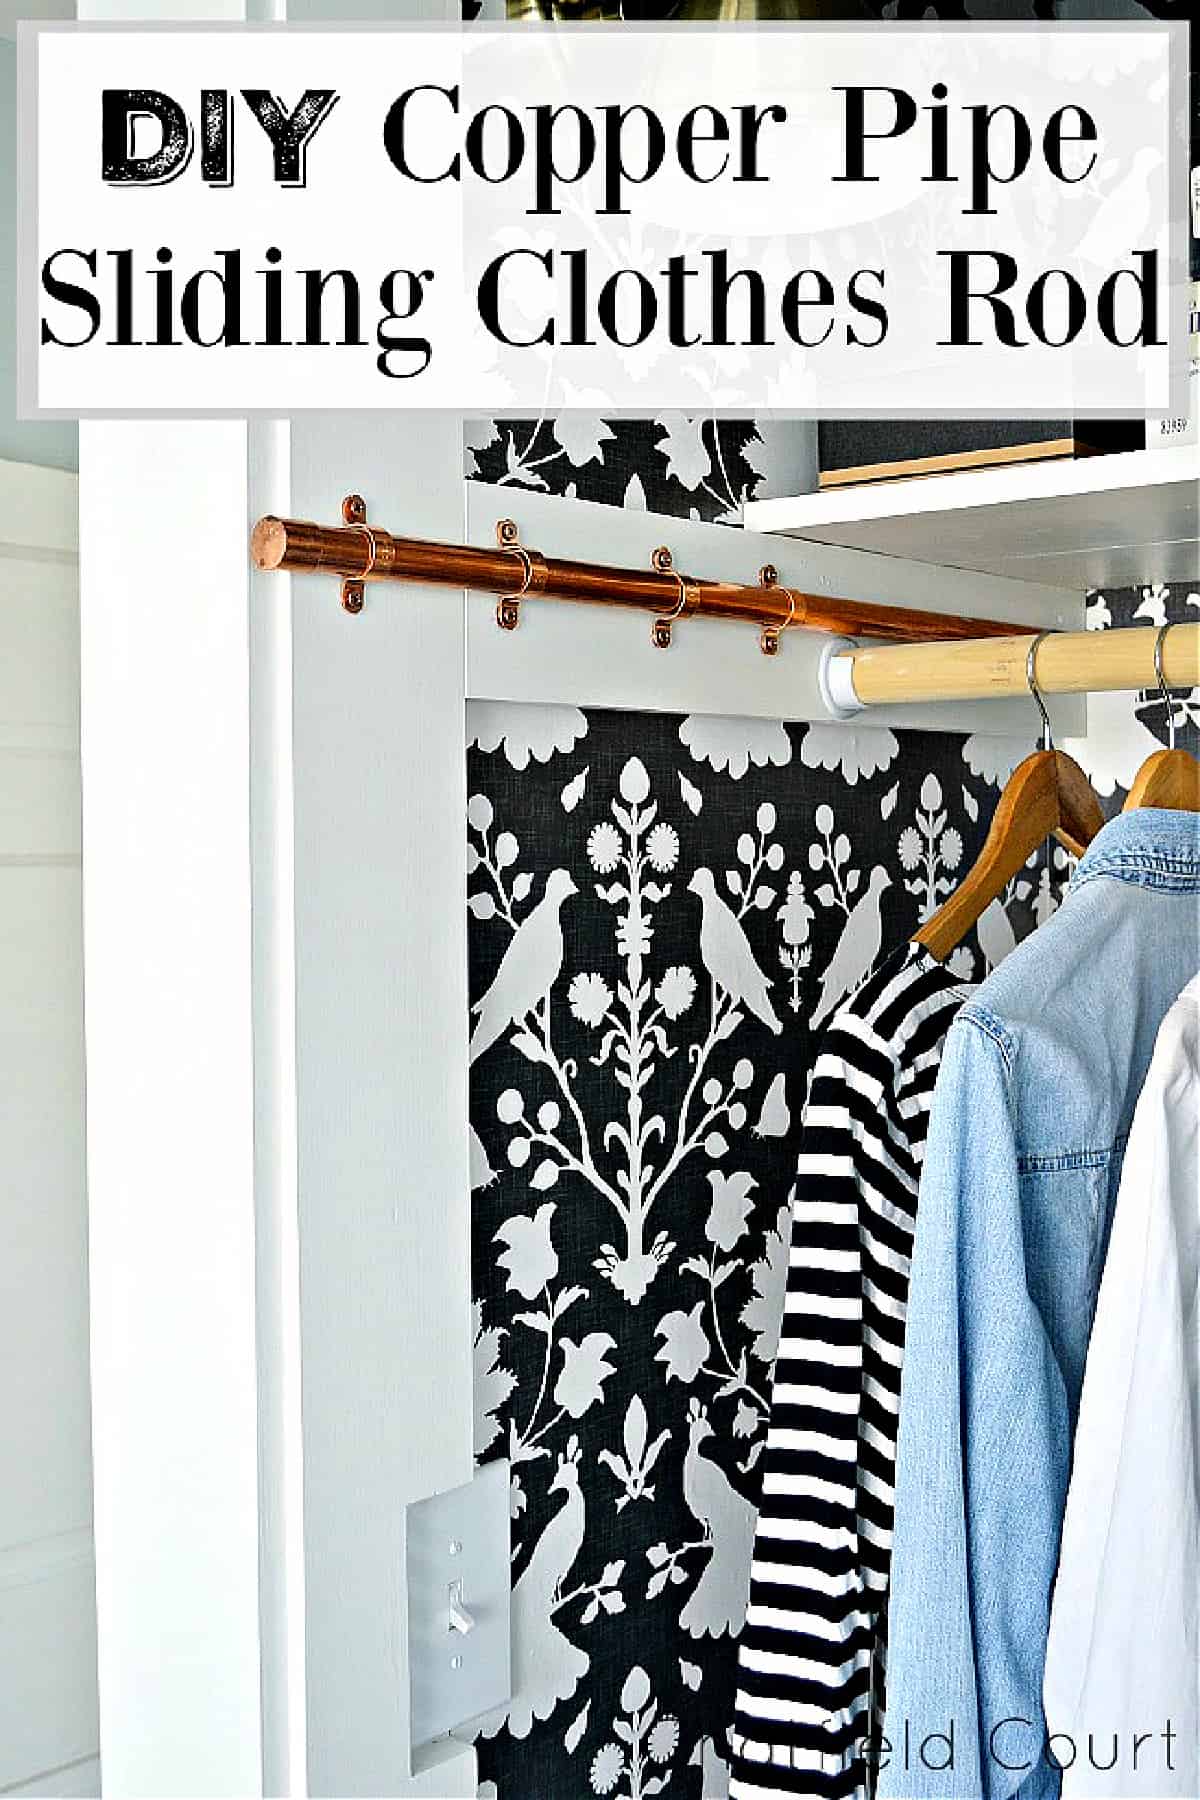
Next, I attached the copper tube cap on the end of the pipe that was going to be sticking out of the closet.

Step #4
Mounting the copper tube straps was our next step. We screwed the first strap, the one closest to the outside of the closet, in place about an inch back from the front edge (with our copper painted wood screws).
The next strap installed was the one closest to the back of the closet. The goal was to make sure the pipe was supported when it was pulled out so we took half the distance of the pipe length (15″) and mounted that tube strap 15″ from the front strap.
You also want to make sure that the back tube strap is level with the front strap.

Next, we slid the copper pipe in the tube straps. Then we mounted 2 more straps between the the front and back strap.
The straps were mounted equal distance between the front and back strap. They also need to be centered up and down so that the pipe could move freely.
After we mounted all the straps, we realized that the pipe was a little snug sliding in and out. To fix this we added spacers under the tube straps, which were our copper painted washers.
We ended up using between 2 and 3 washers under each side of each strap.

Step #5
Once the copper pipe was installed I found that it kept hitting the back wall when it was pushed in.
My new wallpaper wouldn’t last long with a pipe hitting it, so I added a small screw near the back wall. It was an easy fix, and it’s completely hidden from view.

With the addition of the screw, the pipe ended up sticking out of the closet and I couldn’t close the door. A quick trim with the pipe cutter and it fit perfectly.

That’s it!
We have a new custom sliding closet rod that cost under $15 and we were able to install it all in less than 30 minutes.


Now I have plenty of space to hang my clothes to dry and it’s been really helpful when we’re packing for a trip.
A win-win!
Now that is impressive and looks good too. Thank for the share.
Thanks so much, Marianne! It’s really worked well for us. 🙂
What a clever idea, I will be doing this in my laundry. We are always short on hanging space for clothes we cant tumble dry in winter. 👏👏
Thanks so much, Anita! I needed something longer than what you can buy ready-made and this has worked perfectly. I use it every day. I hope it works well for your laundry room. 🙂
That is a very clever idea! I could use one of these sliding rods in my laundry room. Love your closet with the pretty wall paper!
Thanks so much, Linda! The copper rod definitely gets a lot of use so it’s been a great addition.
this is very clever! Such a well done project.
Thanks so much, Maria, I appreciate it! 🙂
Wow great idea, I actually have a bunch of copper will try it.
Thanks so much Maria! 🙂
Genius! I need this in my life! Pinned!
Thanks so much Julie! 🙂
I have said it before and I will say it again, and probably again. Brilliant! Your ideas are so clean, nice, and budget friendly. I adore your blog. One day I will get to do my ceilings like yours from your other home. Thank you for sharing. I appreciate all you do and share. Take care.
You totally made my day, Tracy! Thanks so much for your sweet comment and for supporting Chatfield Court. I couldn’t do this without all of the support I get from such loyal readers, like you. 🙂
Copper is so chic! I love what you did – very smart & so functional!
Thanks so much Sandra! I love copper too and I’m glad that I was able to use it for this project.
I love this copper idea. Is that wallpaper in your closet? I love that too, where did you get it?
Thanks.
Thanks so much Lori! Yes, it is wallpaper. I have a post on how we hung it, and the source, linked at the end of this post.
You are a fountain of great information !! Thank you so very much .
Awwww, thanks so much Susan, I appreciate it! 🙂
What a great idea! Love the copper!
Thanks so much Susan! The copper is my fave part. 😉
How clever Christi. I could have used that idea in the last place I lived. I had to hang things on my shower rod. 🙁 Now I have a lot of closet room with a walk in closet in the master. I use the back rod for wet clothes, It is so convenient. I just move them from one rod to the other. Great idea.
Thanks so much Debbie! I’ve used a shower rod to hang clothes on too. We just couldn’t do it in this house. You always have to think out of the box when you live in a small old home. 😉
Hope you are doing well.
I just bought something for my laundry that is in a closet that is not even close to be as cool as this
is. How did you ever come up with it?????
I’m putting one in our vacation home now that I’ve seen this.
Thanks so much Jean! I looked all over online for one and knew that I could probably create my own, and make it the size that was good for us. My local home improvement store never lets me down. 😉
I’d love to see a pic if you put one in your vacation home. 🙂
So clever…Love this idea for “staging” my outfits for the next day.
Thanks PJ!
Yes! I “lay” out my outfits too, especially when we are going to travel.
Very clever idea…and super stylish!
Thanks so much Kim! 🙂 I love the functionality of it.
What a great idea! I have a hook that hangs over the door but when there’s nothing on it I hate the way it looks. This would be an easy solution. Definitely going to pin this for future. Surprised to hear you weren’t feeling well. I’ve been busy with other things and haven’t been checking my emails regularly. Glad to see your feeling better.
Thanks MJ! I’ve been searching for a solution since we moved in. I wanted to just buy something and be done with it but I couldn’t find anything in the size that I needed. I’m happy with the way it turned out.
Thanks so much for visiting. I hope you are doing well.
What a beautiful closet! You are so creative! Thanks for sharing 🙂
Thanks Julie, I appreciate it! I love our new little closet. 🙂
Very clever! And pretty!
Thanks so much, Julia!
Another great project! So glad you are feeling better and keep on keeping on. We all do don’t we? I can’t get in the “fall” mode yet because it is still in the 90’s here in Florida. So far I have a fall wreath on the door and a little arrangement on the coffee table.
Thanks so much Brenda!
Nothing to do but to keep going, right? We’ve finally gotten fall weather here and it’s hit us in a big way. 40’s for the lows this weekend. Ugh…I’m so not ready for cold.
Another great idea. You’re so good at coming up with simple solutions – and its also pretty, even with the door open. I really don’t need one since I have delicates hanging space in my laundry room, but I almost wish I did. 🙂
Thanks so much Pat! I wish I had a pretty, and clean, laundry room that wasn’t in the dark and dirty basement. 😉 I’m happy with my new copper clothes rod though.