
RV Renovation Before and After – An Update

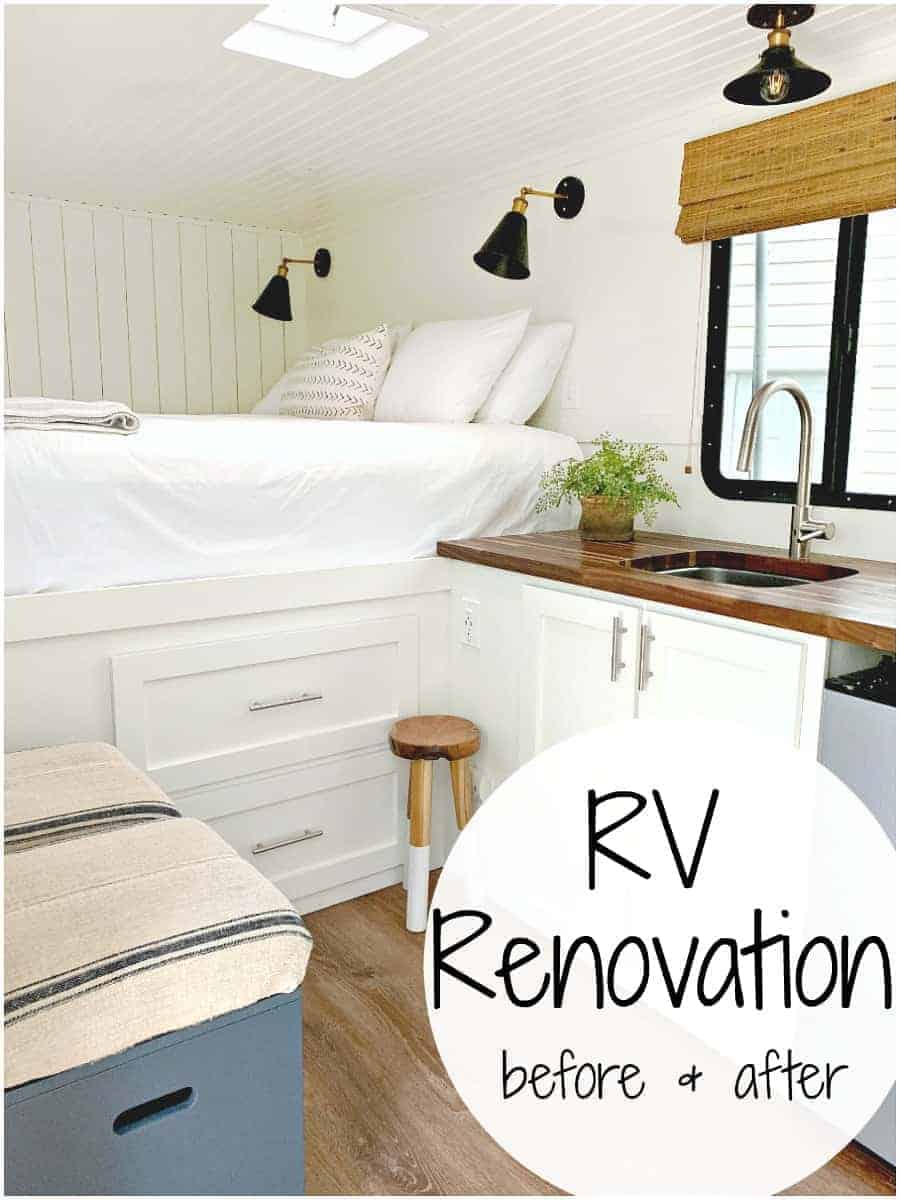
An RV renovation before and after on our not quite finished tiny home away from home.
It’s been a minute since I shared an update on Minnie, our tiny home away from home camper, but we are at a good point in the renovation process where you can really see the progress.
This post is sponsored in part by Pfister. I received product but all opinions are my own.
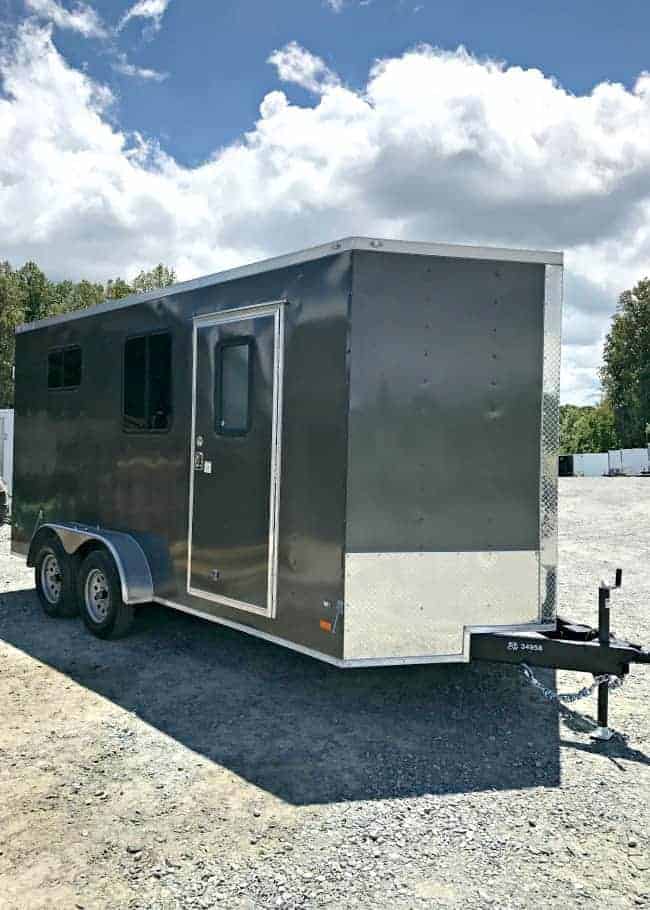
This is our Minnie on the day we picked her up. Little did we know then that it would take 16 months, and counting, and a lot of hard work to get her where we wanted.
So let’s talk specifics…
Minnie is an enclosed landscape trailer that we had made (for a fraction of what an RV costs these days). We picked the color we wanted, strategically placed windows where we wanted them and had a camper door, with window, installed. We also chose the length and height, 16′ long, 7′ wide and 7′ high inside. In total we had about 112 square feet to work with (which equals about 1/3 of the size of a standard hotel room). She is seriously small.
Everyone that has come inside, who have seen my posts, makes the same comment when they walk in.
“It’s so small!”
As I said…she’s seriously small.
The inside of the RV…
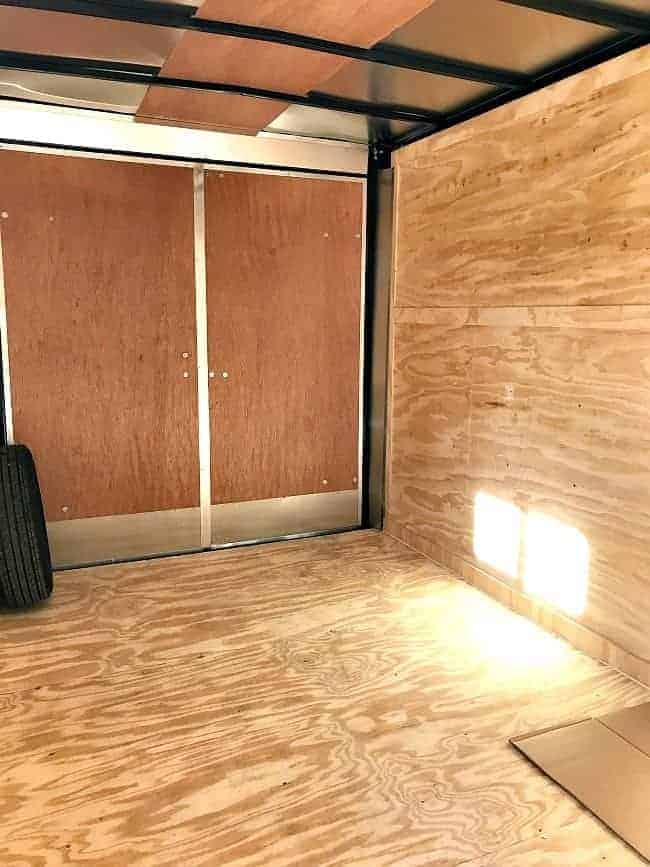
The inside came as all enclosed trailers come…bare bones.
No paint, no bed, no kitchen and definitely no bathroom.
That’s ok because we had big plans for her.
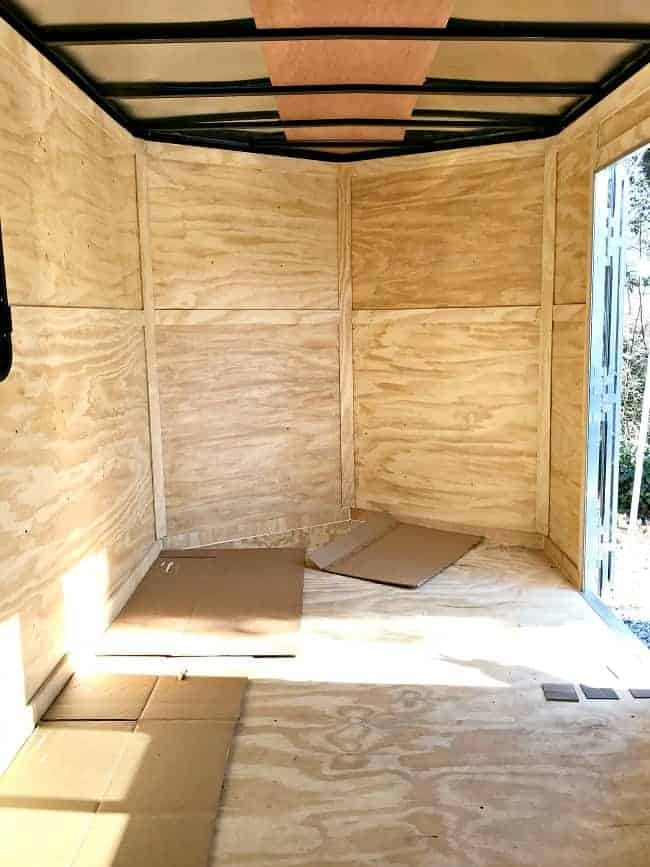
This is the view from the door to the back of the camper. Notice the tin ceiling and plywood floor? We took care of that by installing a tongue and groove plank ceiling and a vinyl plank floor.
Here’s the same view!
We chose a king size bed for our space and have not regretted the decision. Yes, it takes up almost half of the available floor space (remember, we only had 112 square feet to work with), but we feel like it was the right choice for us.
There’s not an inch of the interior that we didn’t touch. The walls got several coats of white paint and we installed woven shades and a couple different kinds of lighting.
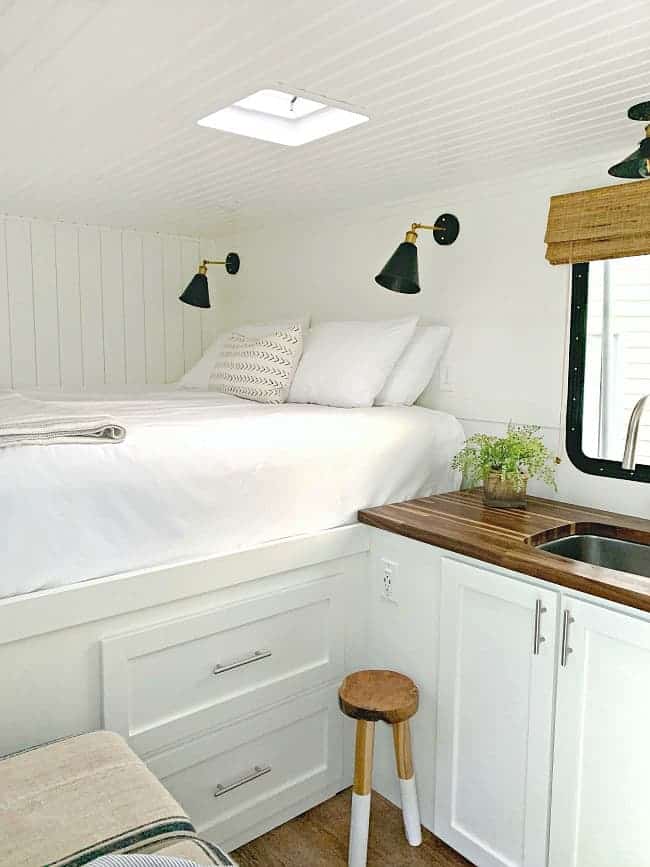
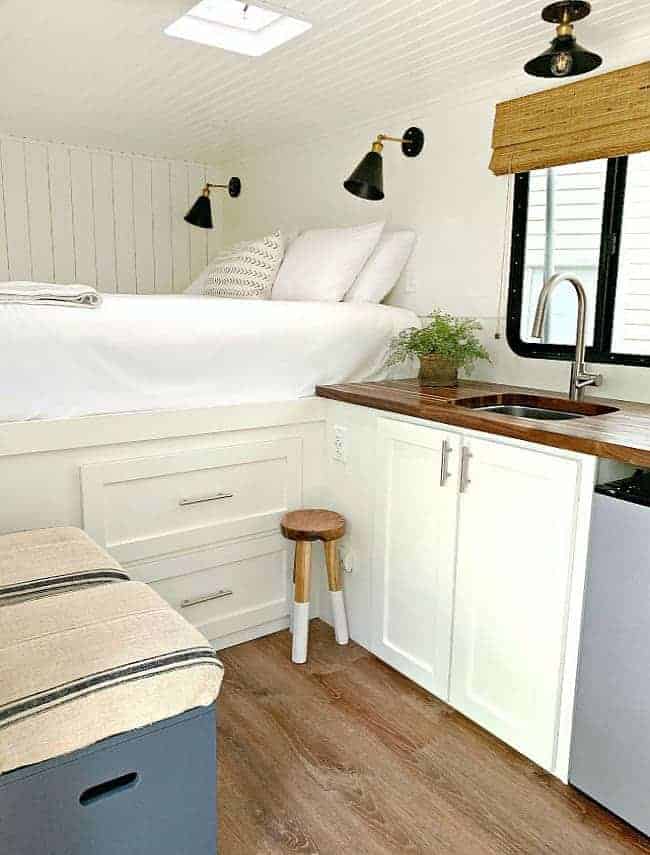
With the bed up in the air, we were able to utilize the empty space with deep drawers. We have more than enough room to pack all of our clothes, with room to spare. The new addition, since our last update, is the drawer fronts and cabinet doors on the kitchen cabinet.
No more blue painter’s tape for handles. We built these bad boys from scratch and they really finish off the space. I used simple pulls to keep the look minimal. We are in a small space and I want it to look clean and bright, dare I say bigger than it really is.
This next view is taken from the back of the camper to the front, which has a V shape to it.
This small and quirky space has become our bathroom. One of my only requests, beside our new awning, was that we had to have a bathroom. That meant a shower and a toilet. I compromised and gave up the idea of a bathroom sink. I mean, we are in such a small space so do you really need two sinks?
Same view!
You can see the tongue and groove ceiling and the shower that we built. It utilizes the v-shape that’s in the front of the camper and gives us a little more room to move around.
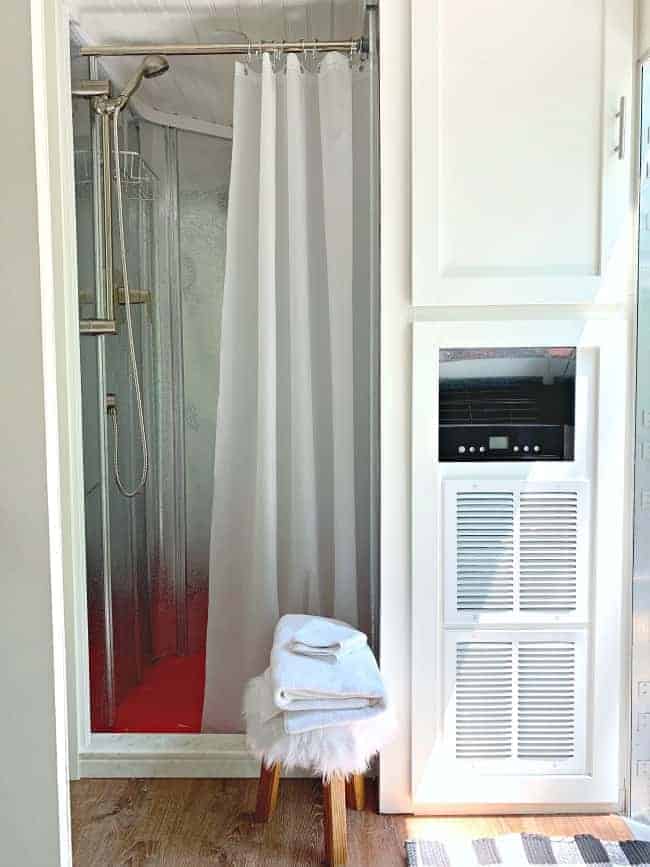
The shower isn’t a done deal yet. We coated the whole space with a waterproof membrane, which is the red color that you see, and built the walls with galvanized metal. The floor will have a teak mat once we get around to building it. That will cover up the red waterproofing layer.
The part of the shower that takes it to the next level is the beautiful shower head from Pfister. It’s adjustable and totally removable, in case we need to wash the dogs after a romp on the beach. We’ve already used this part of the camper and it was way better than expected.
Taking a shower in a camper is different than taking one in your home. We only have a small water heater so we do have to turn off the water when we’re washing our hair or body, which is a small consolation. It’s so nice to shower in our own place.
Next to the shower is a cabinet that will house our hanging clothes. We also have the mechanics for the shower fan in there, all we need to do is push a button to turn it on and set the timer.
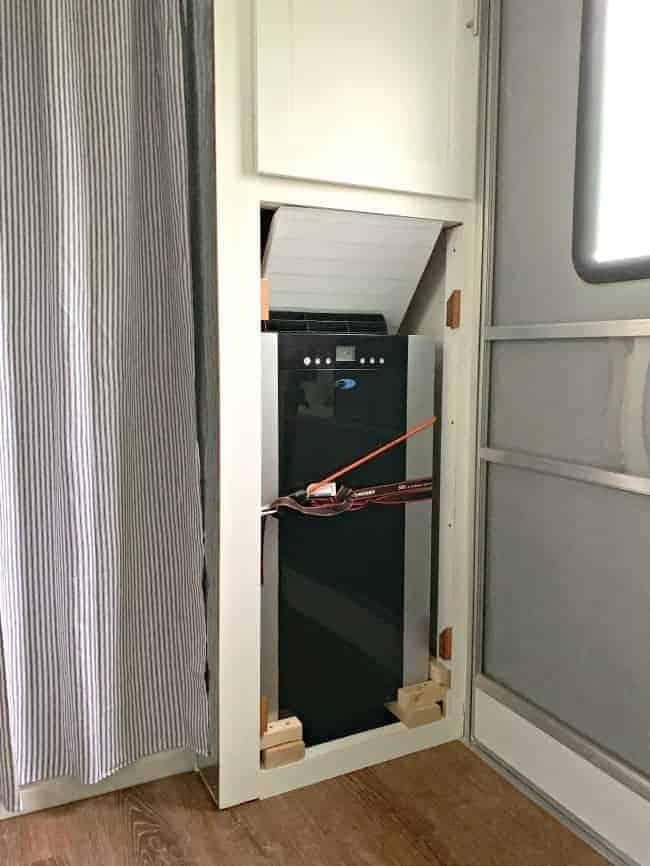
Underneath the cabinet is our a/c. This was a hotly debated subject in our house and compromises had to be made. Roger didn’t want to poke a hole in the roof of the camper, and invite any unwanted water, so we went unconventional with a portable unit. Yes, it’s big and takes up valuable real estate, but it has worked well for us.
I wanted to be cool but I’m all about aesthetics. It had to look good!
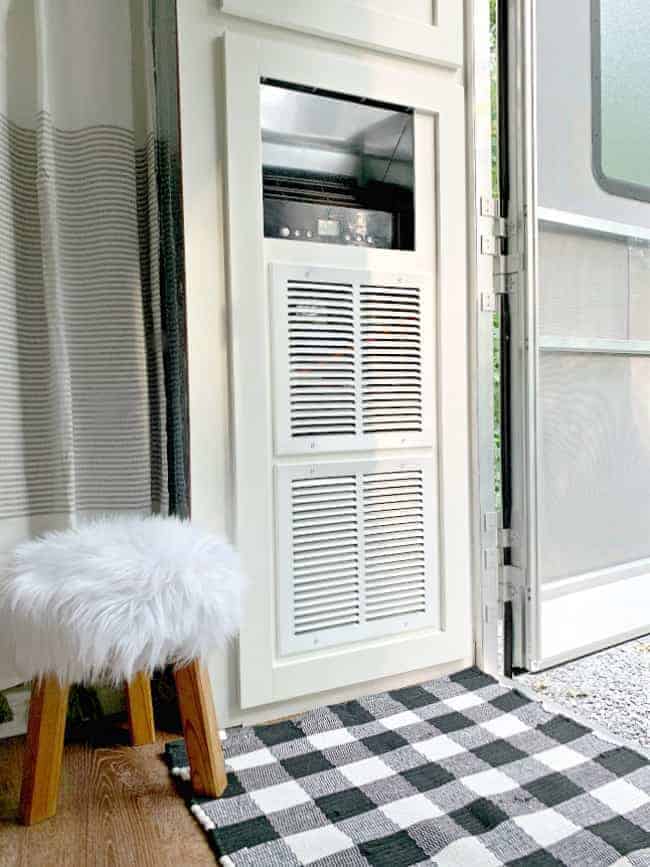
We went round and round with designs to cover the unit, without restricting air flow. We came up with a removable cover with vents that hides all of the straps that we used to keep it in place.
As a matter of interest…
This unit vents out the bottom of the camper (it had to go somewhere and down was better than up). You can’t see any part of it outside the camper and I think that people wonder if we are roasting away in our little tin box. That couldn’t be further from the truth. We have been cool and comfy.
Peeking down by the new flooring you’ll see that we still need to install molding. It’s one of the items left on our “to-do” list.
Let’s take a closer look at the bathroom.
We built the wall to separate the kitchen from the bathroom and had every intention of installing a door. After using the camper a few times, we’ve decided that a door would really limit the space that we do have and could make it feel claustrophobic.
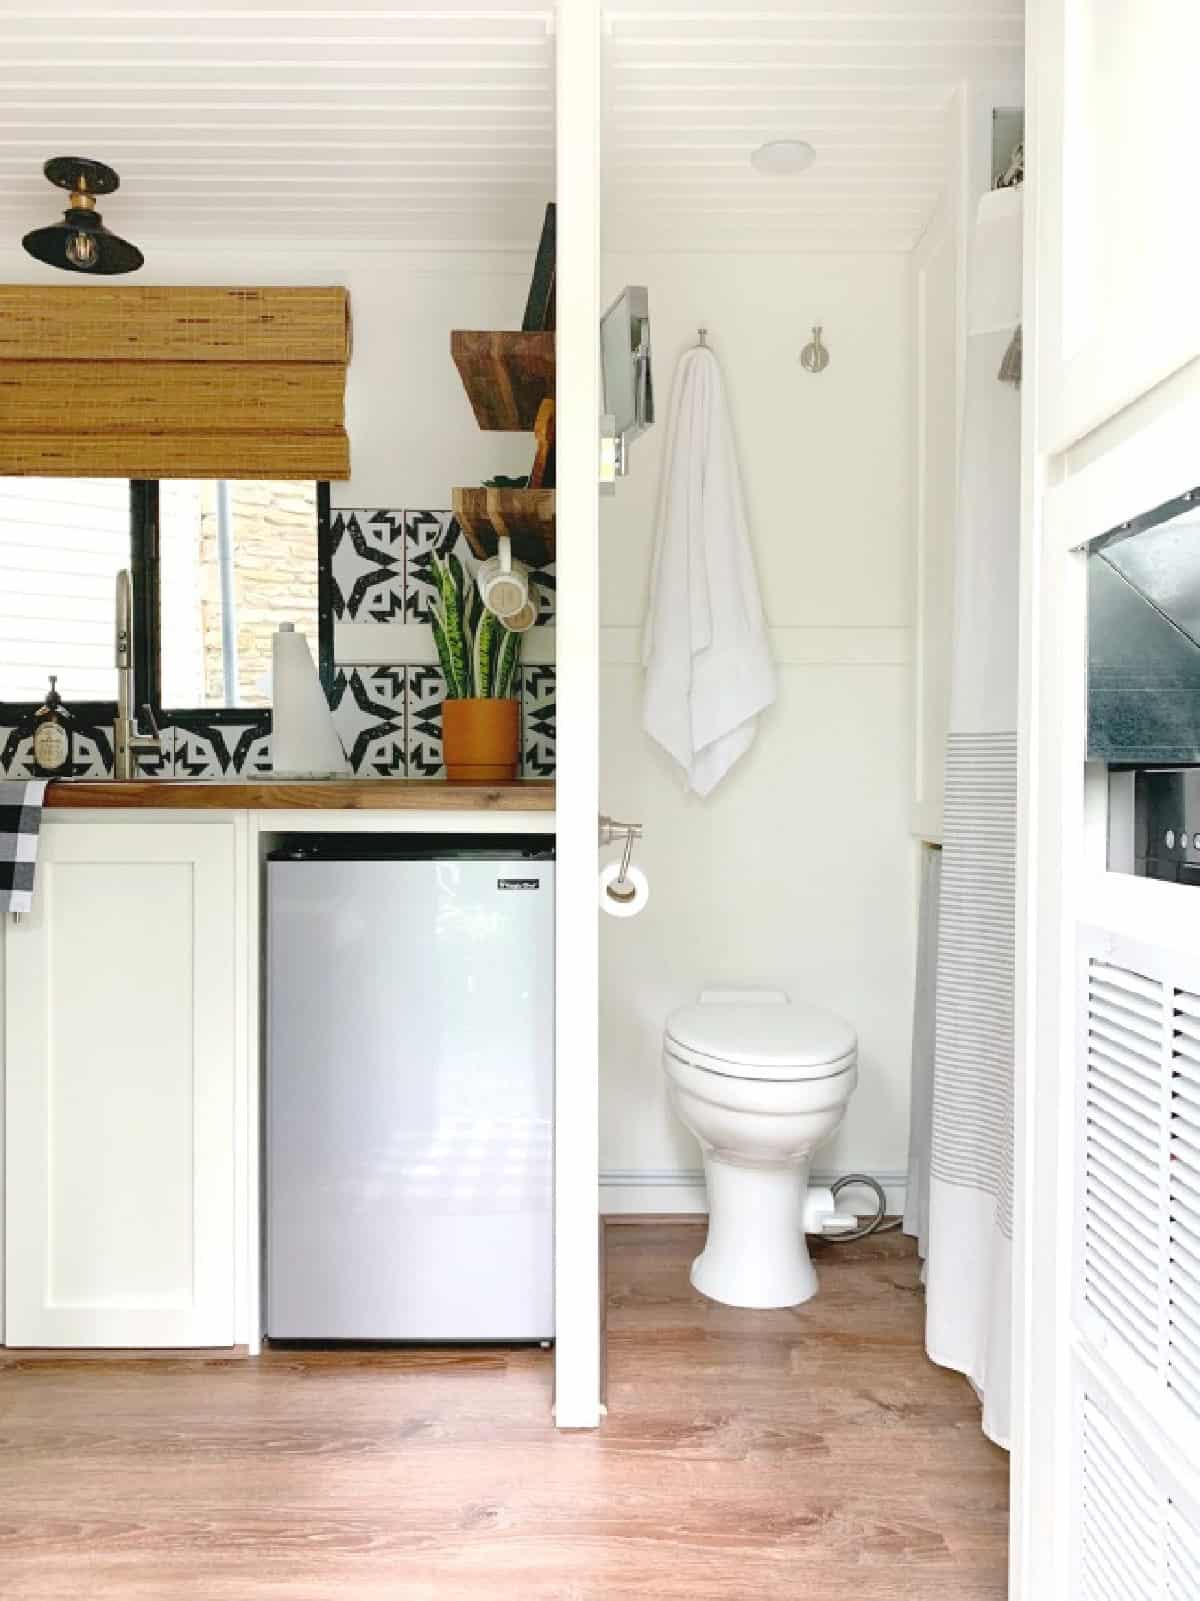
With that said, we will finish up the space by installing trim on the unfinished wall, as well as trim on the floor. We also need to add a little piece, like an apron, above the fridge to hide the supports we put in for the walnut countertop. We don’t want to close it in too much, and restrict the air, but we want it to look better. Ok…I want it to look better.
You’ll notice that I added 2 Renato robe hooks behind the toilet, from Pfister, and a Renato toilet paper holder, also from Pfister.
Speaking of toilets, this is a camper toilet made of porcelain. It’s tall and feels just like a toilet you would have in your home. The only difference is that you have to step on a pedal to flush. Normal for RV toilets.
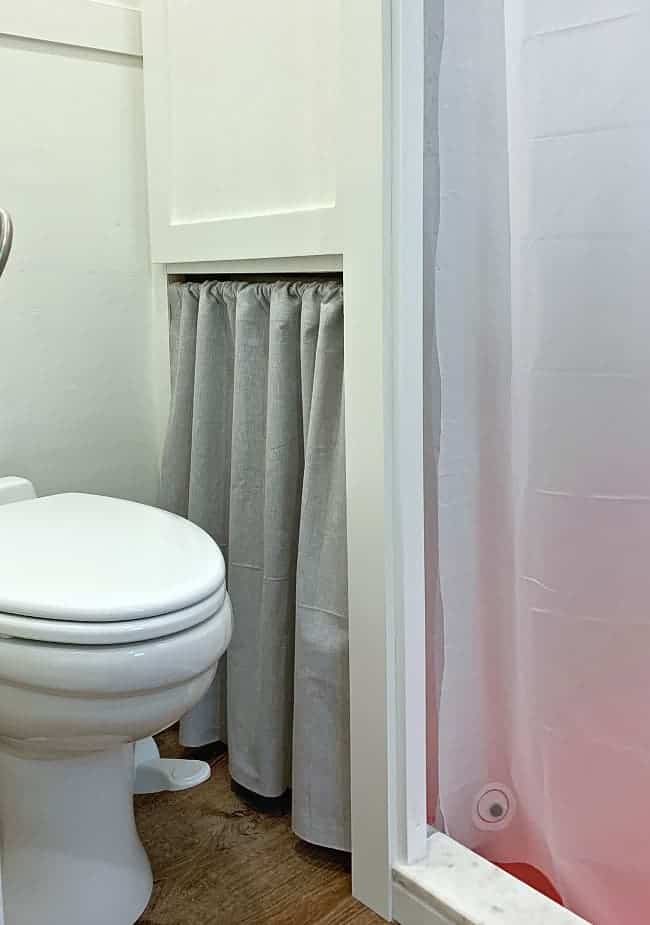
We also snuck in some storage in this odd little space. The top part, with our newly made door, has two shelves. Plenty of room for towels, toilet paper, and all of my toiletries (which are kept in baskets).
The bottom is also storage, and the plumbing for the shower. We couldn’t put a regular door on here, because of the toilet, so I made a no-sew curtain and hung it on a tension rod. It’s the perfect solution and adds a bit of softness with the fabric.
I will say that the hubs really doubted my solution but loved it when I put it up. When will he learn to trust me?
And back we come to the kitchen.
Over the winter I worked on the walnut butcher block countertop that we installed. 9 coats of protection and 2 weeks of work. It was all worth it though, because it’s a beautiful addition. This is our one and only sink so it is very hard working.
The faucet is from Pfister and it is perfect for our RV. You can turn it on and off with the wave of a hand. You can read all about the install, and more on my walnut countertop, in our RV remodel update.
Notice that we don’t have a stove in here. We both grew up camping, and have had many a camper with a stove/oven. We never used it. There were occasions when I would heat something up on the stove but we never cooked or baked in the oven, it just makes your tiny space that much hotter.
We chose to leave out the stove and will likely cook outside on our grill. This camper was all about comfort for sleeping because most of our living happens outside (hello…we’re camping!). We may add an induction cook top at some point but I love all of the empty space on the countertop and look forward to using it.
I’m still mulling over ideas for the backsplash and have plans to install 2 floating shelves next to the window, by the bathroom. Both of these projects will be last on the list.
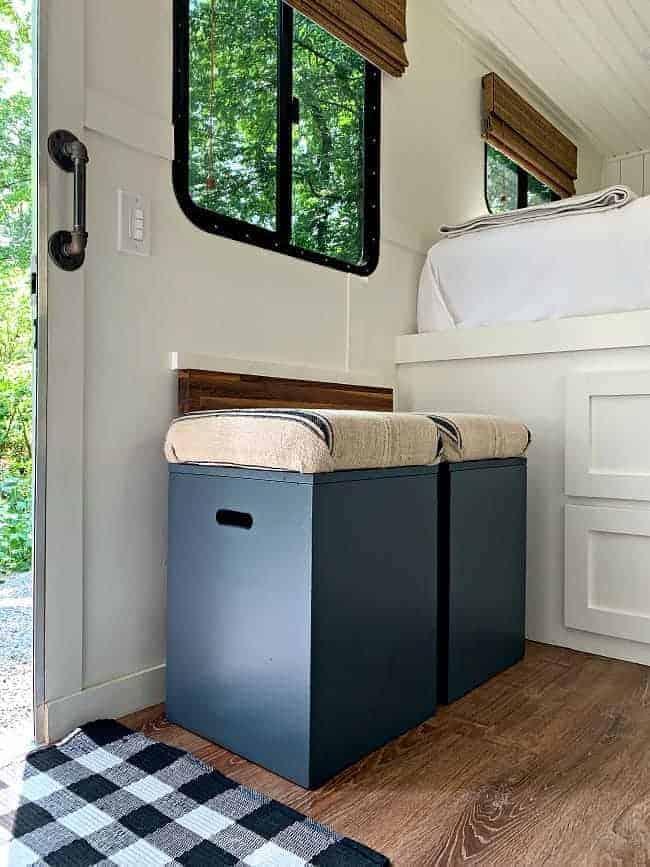
One more thing to talk about are the storage stools that I built. They are multifunctional and have really worked out well. I made them tall enough so that we can climb into bed and they are perfect for extra storage. The dog towels and other doggie items are in one, and our dirty laundry goes in the other.
We can also use them to sit on. We installed a walnut butcher block table that folds down and out of the way. If we need it, we can just pull it up and use the DIY storage ottomans that I built.
Our last addition is our new awning.
If you follow us on Instagram, you would have seen this 8 hour project unfold. It took time to install but it looks better than I had hoped. I can’t wait to take her out and set up our awning. No more funny looks at our rigged up piece of plastic with 15 strings all over.
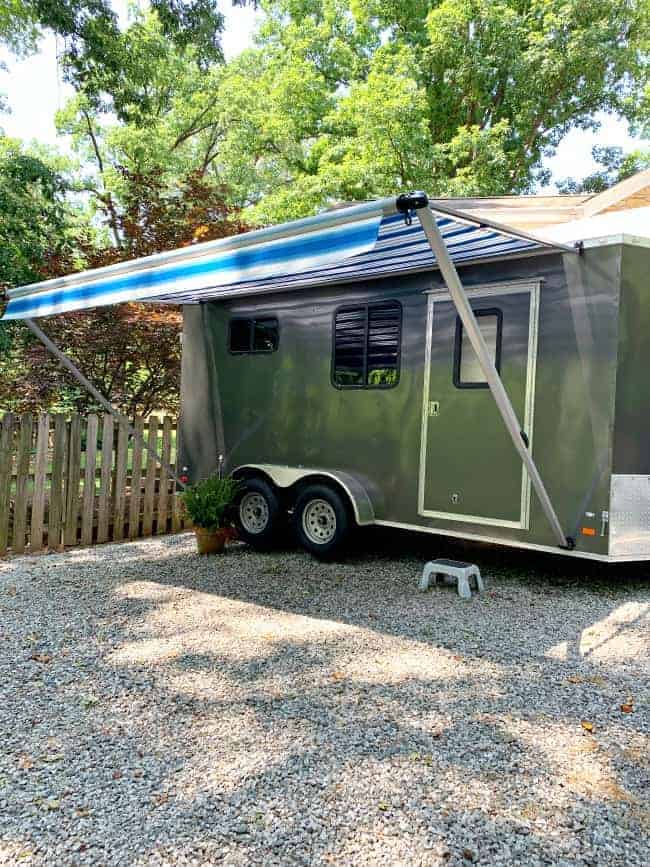
So that’s our little RV before and after. It’s not quite all the way done but she’s come a long way. A few more projects and we can enjoy all of our hard work. Like I said, we have the trim to install and a shower floor mat. We also have some outside projects to do too, like removing all of the caulk around the windows and putting up new. Once it’s truly done, I’ll share another quick update.
Thanks so much for coming along on our journey to creating our dream home away from home. We have thoroughly loved every minute of the process and we’re sad to see it end, but thrilled to be able to go out and camp. We’re already talking about making another. Maybe down the road when we’ve had time to use Minnie and enjoy our hard work.
Check out our other progress reports, and Minnie’s first introduction (and more before photos)…
- Introducing Minnie, Our Tiny Home Away from Home
- Tongue and Groove Ceiling Installation
- RV Renovation Progress
- How to Lay Vinyl Plank Flooring
- RV Remodel Update – A New Countertop and Kitchen Faucet
Oh my gosh that is an amazing transformation of a landscaping trailer! It is absolutely gorgeous!
The transformation in this RV is truly amazing! You guys did an incredible job!
Thanks so much, Roxanne, I appreciate it! 🙂
Kristi, I always have admired all of the camper makeovers that I’ve seen…but your project truly is the most creative out there!! Sharing and pinning!
Thanks so much for your kind words, Janet! Coming from you, that means a lot to me. It was truly a labor of love for us.
Oh my I am so impressed with this! We are considering an Airstream in the next couple of years. What you have done with this is so impressive!
Thanks so much, Cindy! I have my eye on old airstreams. I would love to make one our next project. 🙂
Wow. What an amazing job you did. Y’all really stepped out of the box for this one and it looks spectacular.
You two are true craftsmen…er…craftspeople! I am so impressed. Enjoy your vacation home, it really is just so charming. And I love that you can take your charm with you on the road!
Thanks so much, sweet friend! We had a blast building it and I’m sure we’ll have just as much fun taking her out on the road. There’s nothing like going from place to place and being able to sleep in your own bed. 🙂
Love the pictures and the update! Minnie is lovely!! So classy looking and a big comfy bed at night time!!! Thanks for keeping us all up to date!!
Thanks so much for following along, Susan! The big, comfy bed is my favorite thing! 🙂
Kristi/Roger — They say a picture is worth a thousand words and that is mostly true of your renovation of Minnie. Your pictures do indeed show a beautiful little RV created from nothing by two people who painstakingly planned each and every detail over the 16 months. They show a gorgeous walnut stained counter with a great deep sink and faucet nice enough to be in any kitchen. They show a porcelain toilet that doesn’t appear in many RVs. Not to mention the storage drawers and closets that utilize every inch of space in the 17′ trailer better than in most older homes but also do double duty as seats and a step to get up into the bed. They show an amazing shower fit for humans and fur babies alike. They show a bed that is roomier and more comfortable than most hotels. The inside is bright and cheery with room darkening shades just like home or not. There is a carbon monoxide detector, battery/electric lights, enough storage at the backside to carry tools and most anything that might be needed on a trip to the great outdoors. The pictures cannot capture the love and attention, planning and experimenting, trial and error of your efforts– or maybe they do. I saw Minnie last weekend in person and it is everything and more amazing than the pictures describe. It is truly a one of a kind work of art and love. You should be proud to show her off. Those people at the campground don’t have a clue of what’s behind the grey metal door.
Thanks so much, Mom! I’m so glad to hear that Minnie made a good impression on you. It was fun showing her off and having you see her in person after all the talk about her. We both appreciate all of your support during this big build. xo
Looks amazing!! Happy travels to you!
Thanks so much, Pat, I appreciate it!
Hello Kristi and Hubs! Drum roll please, ….and the award for BEST IN SHOW small RV goes to……………..MINNIE!!! You guys have kicked many tiny house” builds in the pants! Just look at all the amenities, comfort, coziness, decor, engineering, functionality, storage, and style you have create in a transportable vacation home! This was truly an amazing build that I thoroughly enjoyed following here on your blog, as well as FB and IG!!! As I mentioned to you before, you work on Minnie’s interior inspired me to give my She Shed a refresh and update beginning late last fall. I am happy to say Spring has finally decided to stick around here in New England, so I am finally back to work, woo hoo!!! Thank you for letting us follow along and sharing so much information on the creation of Minnie! Now go enjoy the fruits of your labor!!
This!!! It totally made our day, Kaycee! Thank you so much for the kind words and for following us, and offering encouragement, all over SM while we took on this project. I’m so happy to hear that you enjoyed following and appreciate all of the real work that went into her. It was sometimes hard to relay all the thought and work that went into building each part of this so it’s nice to hear when someone “gets it”. 🙂
It makes my heart happy to hear that we inspired you to update your sweet She Shed. I’m loving the changes that you’ve made and look forward to seeing more. It sounds like a fun project!
Thanks again for all of your support, Kaycee! xo
Enjoy your journey’s because I can’t wait to ride along with snap shots of your pictures. You’ve already taught me so much about Minnie.
Happy Trails,
Karen Marie
Thanks so much, Karen, I appreciate it! We look forward to many fun trips in our tiny RV and will, of course, share it all. 🙂
I, along with many others I’m sure, are just amazed and so impressed at what you and your husband have done with this little trailer. To have it shown on your blog and on Instagram is not enough exposure. I would hope for Minnie to somehow go national and you two earn some recognition for what you’ve done. Your suppliers are missing out on a major opportunity to promote their products and you and your husband deserve are so deserving of personal credit.
Enjoy. Enjoy. Enjoy. You’re earned it!
Awww, thanks so much, Pat! Roger and I both appreciate your sweet comment and we’re so happy that you enjoyed following along. We didn’t set about this project to get “noticed” but I’d love to share it in the hopes that others will see that you can step out of the box when it comes to RV living, and that living (or RVing) small can be comfortable. Unfortunately there are so many other great RV remodels out there now so competing for exposure, even on a smaller scale, is a tough task. I’ll do my best though and hope that others that love it, like you do, will share it when they can.
Thanks again for the lovely comment and for your continued support of Chatfield Court. We would have never persevered through the tough times during the build without the support and encouragement from our loyal readers, like you. Now we’re ready to enjoy all of our hard work. xo
Absolutely wonderful, Kristi! I just love it! You’ve done such an amazing job…. as always! I hope you both have many happy years in your tiny mobile home. 🙂
So sweet, Liz! Thanks so much for following along. It’s been a long and challenging road but so fun. Looking forward to getting her out on the road and enjoying camping again. 🙂